Jan 31

The California Cottage: Backyard Overhaul AKA the Most Annoying Renovation Ever.

pin it!My small house is on a very large lot that is only 25 feet wide but almost 200 feet long. The lot is flat, so all the land is 100% usable for pretty much whatever I want — a veggie garden, a pool, an art studio… so many possibilities. I always knew that this yard had huge potential but landscaping is exorbitantly expensive so for the longest time I just didn’t have the willpower or the funds to make something like that happen.

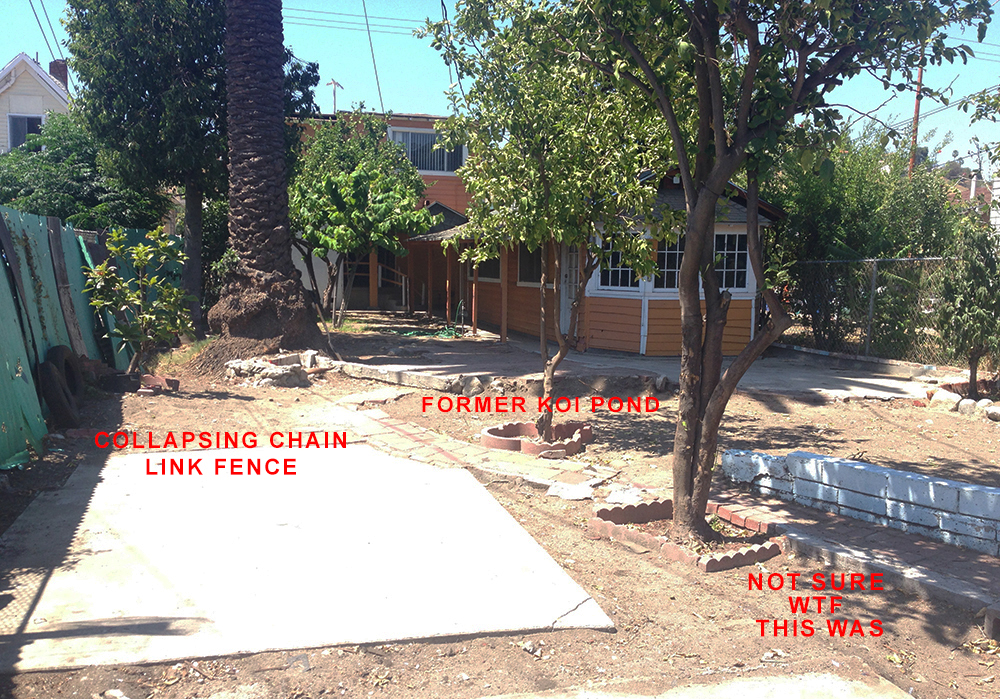
My front yard and backyard were a massive eyesore. The chain-link fence was falling over, the grass was all dead, and the cement walkways were poured badly and looked terrible. The previous owners had a KOI POND at some point, which resulted in awkward hills and valleys as well as all kinds of weird concrete and brick debris.

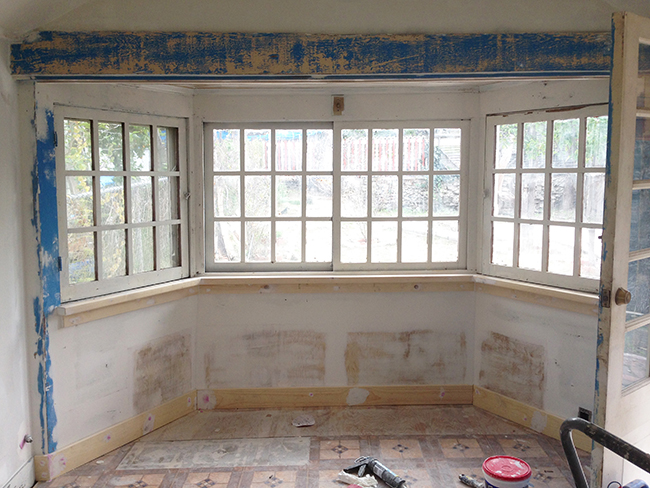
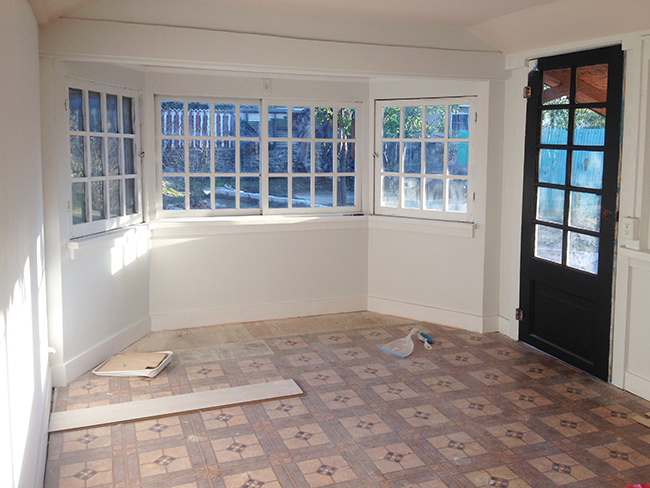
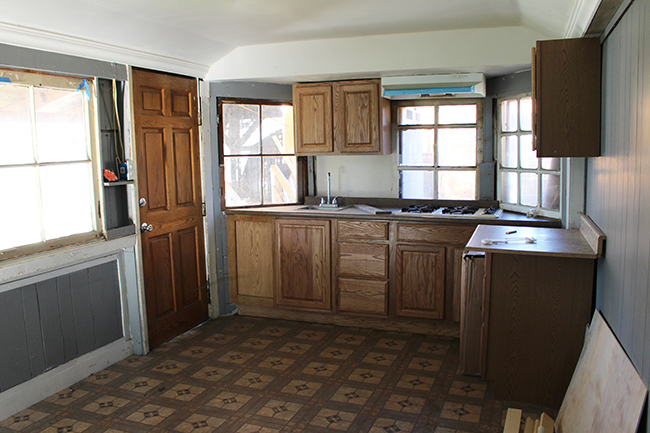
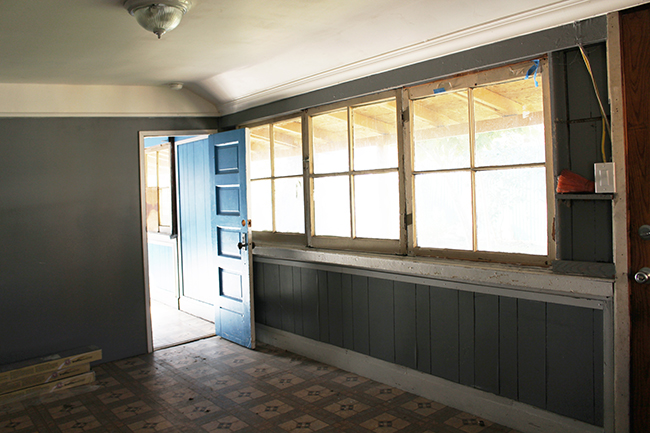
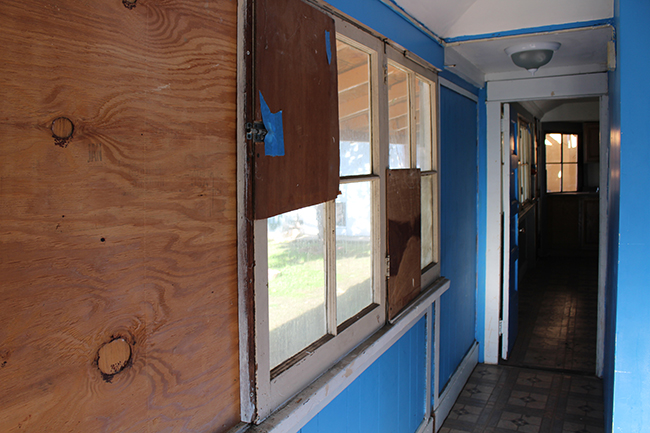
The little cottage that I live in is tucked in the backyard of my property. It has 14 windows, 13 of which looked out onto my dirt-blob yard. For years I just kept the blinds drawn to avoid looking at it, but as soon as I had the money saved, I decided to start designing.

pin it!

My main motivation for her embarking on this yard renovation was to manage the dust. Los Angeles is in a drought most of the time so the soil here has no weight to it. Every time the wind blows, tons of dust flies all over the yard and somehow ends up all over the inside and outside of my yard. No matter how much I swept there was no controlling the dust.

pin it!

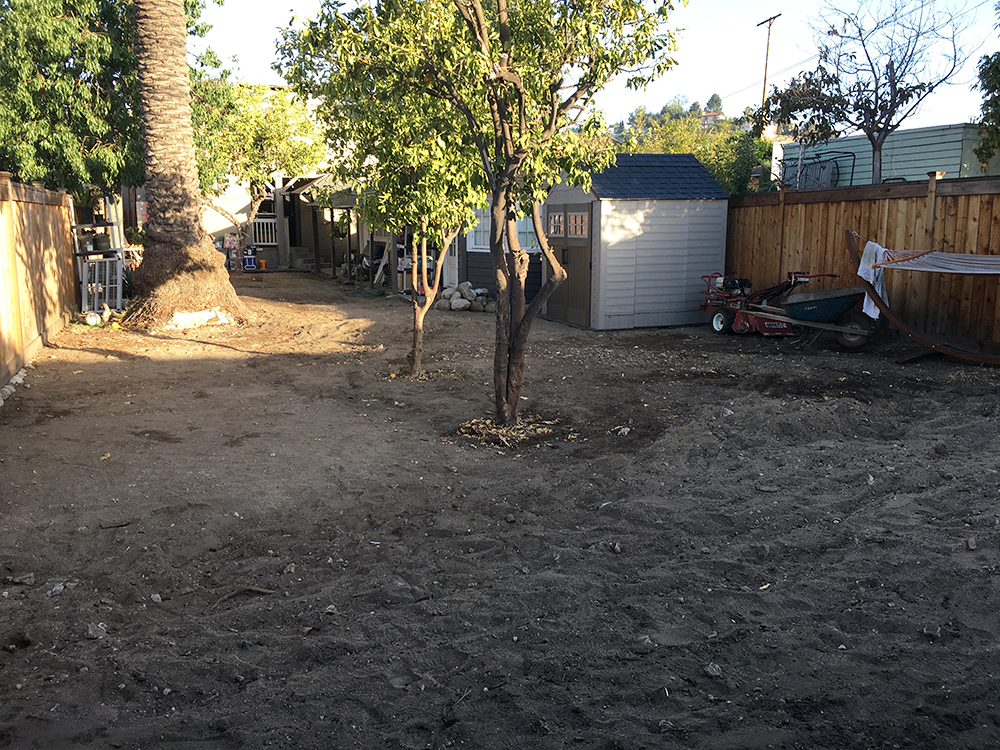
The first step was to hire somebody to demolish all the little bits and pieces of leftover projects so we could start with a blank slate. I can’t decide if that made it look better or worse.

pin it!

Sorry about the ugly pictures and ugly notes, but there’s really no better way to convey this information!

pin it!

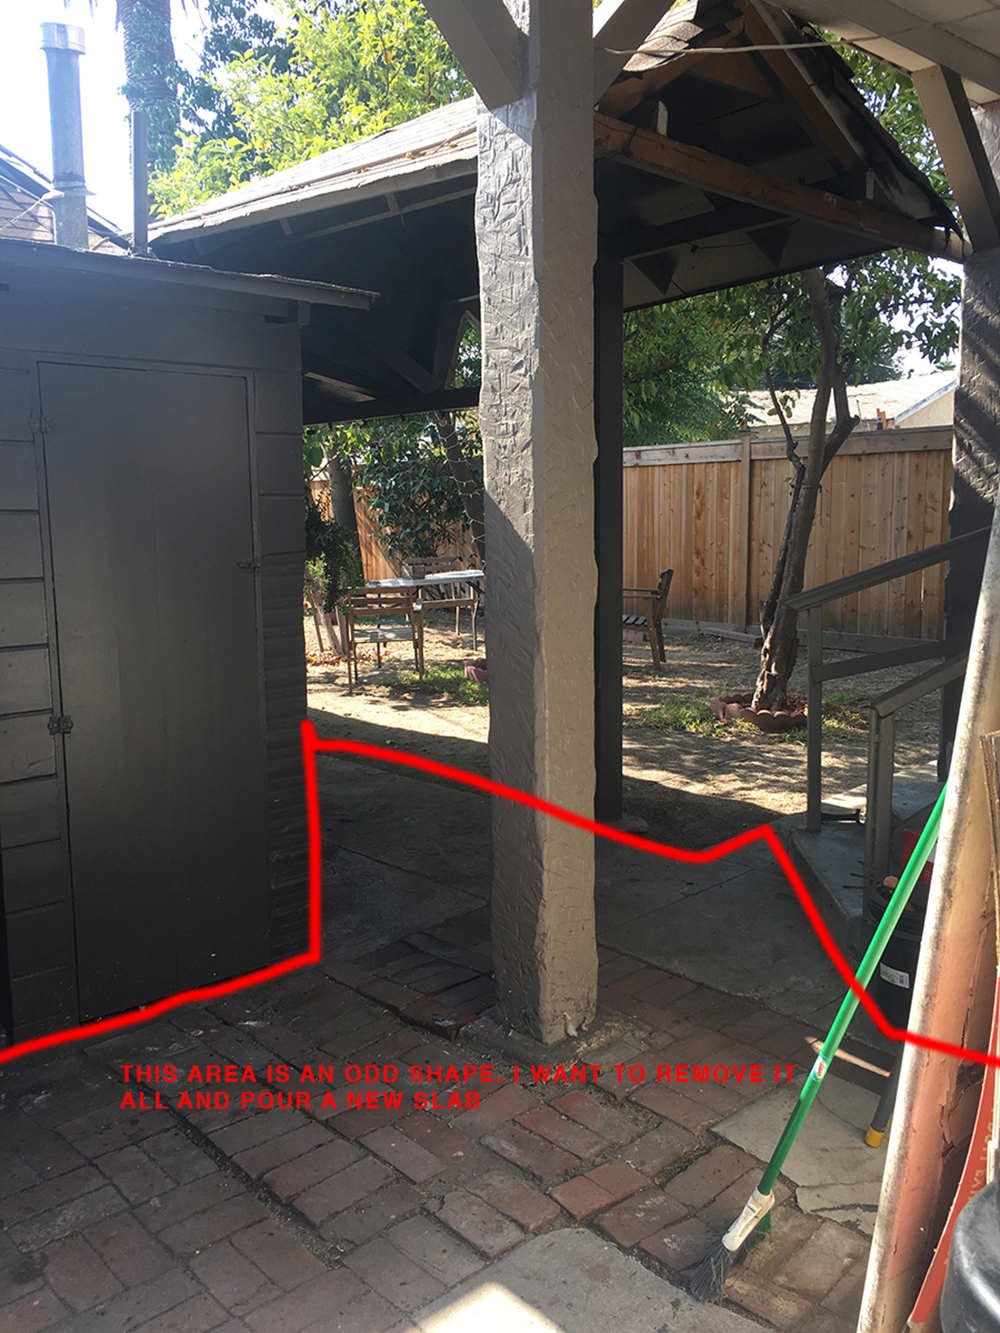
This is the area between my main house and my cottage — a 6′ wide path composed of 5 separate concrete slabs and mismatched bricks that were not secured in any way.

pin it!

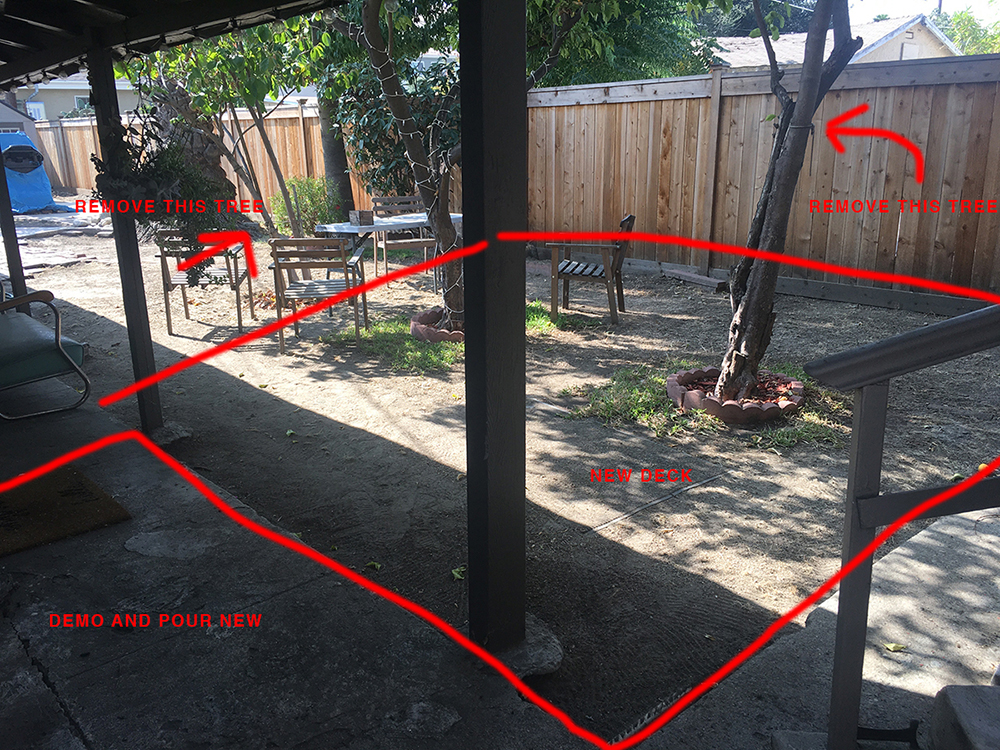
My dream was to walk out the door onto a beautiful, new deck. Unfortunately, someone planted 3 trees right in the middle of the area outside my house, so there was no room for a deck. I decided that I didn’t need 5 lemon trees, so I had two removed. I also removed 4 or 5 smaller bushes and shrubs that were poorly placed.
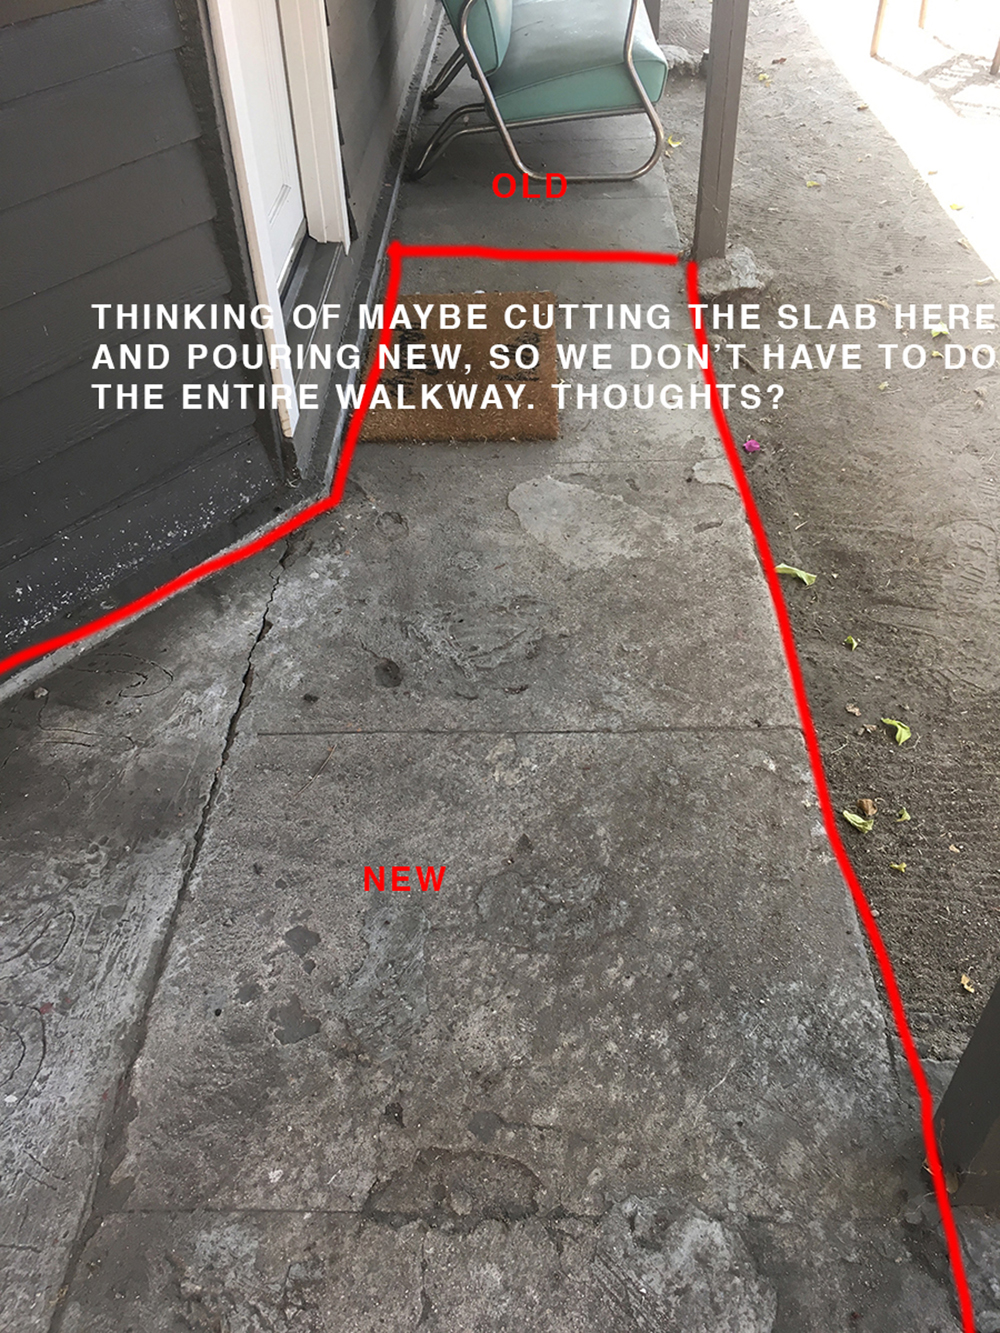
 pin it!

This is what much of the concrete looked like on my property. I think this is a result of someone doing a skim coat over an old slab without proper preparation, so the top layer chipped off over time. 
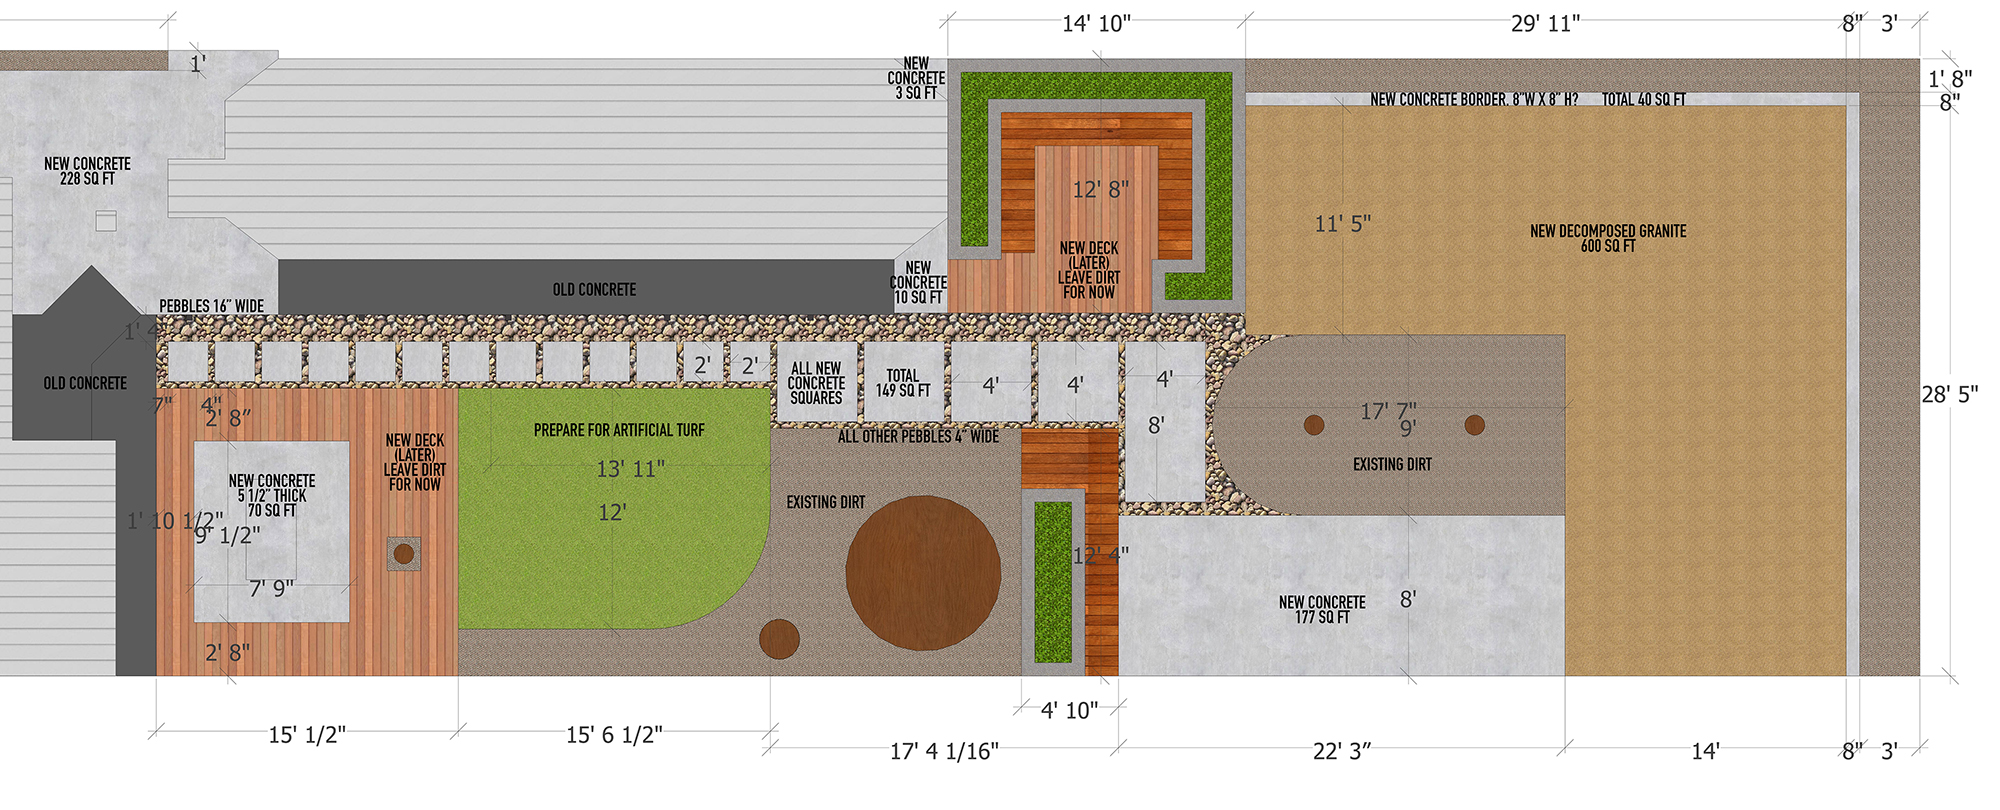
pin it!I am relatively experienced when it comes to interior design, but landscaping was all new to me so I did what any civilian would do – I went on Pinterest and started pinning. I put a good 200+ hours into the design and research over the course of 6 months. It became clear to me that if I was going to renovate this yard it would be a 100% complete demolition and rebuild.

pin it!

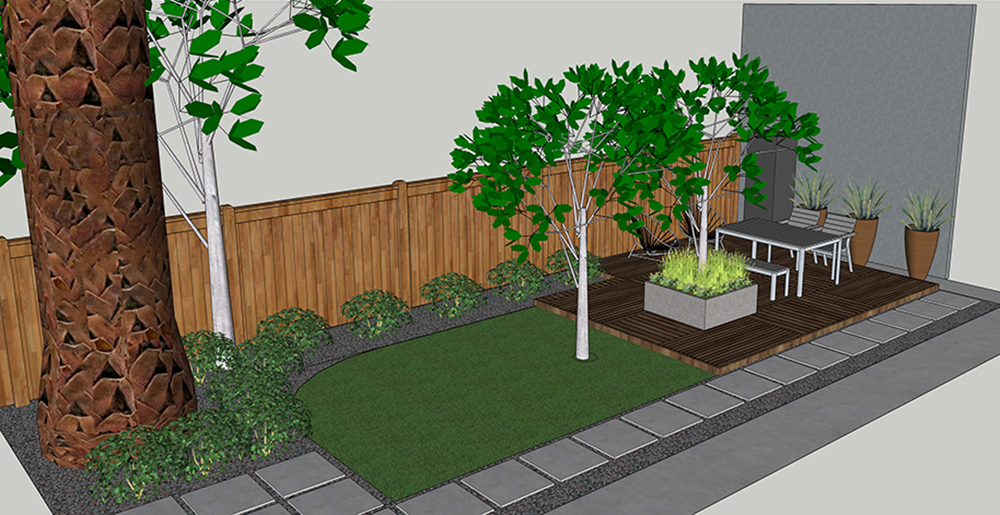
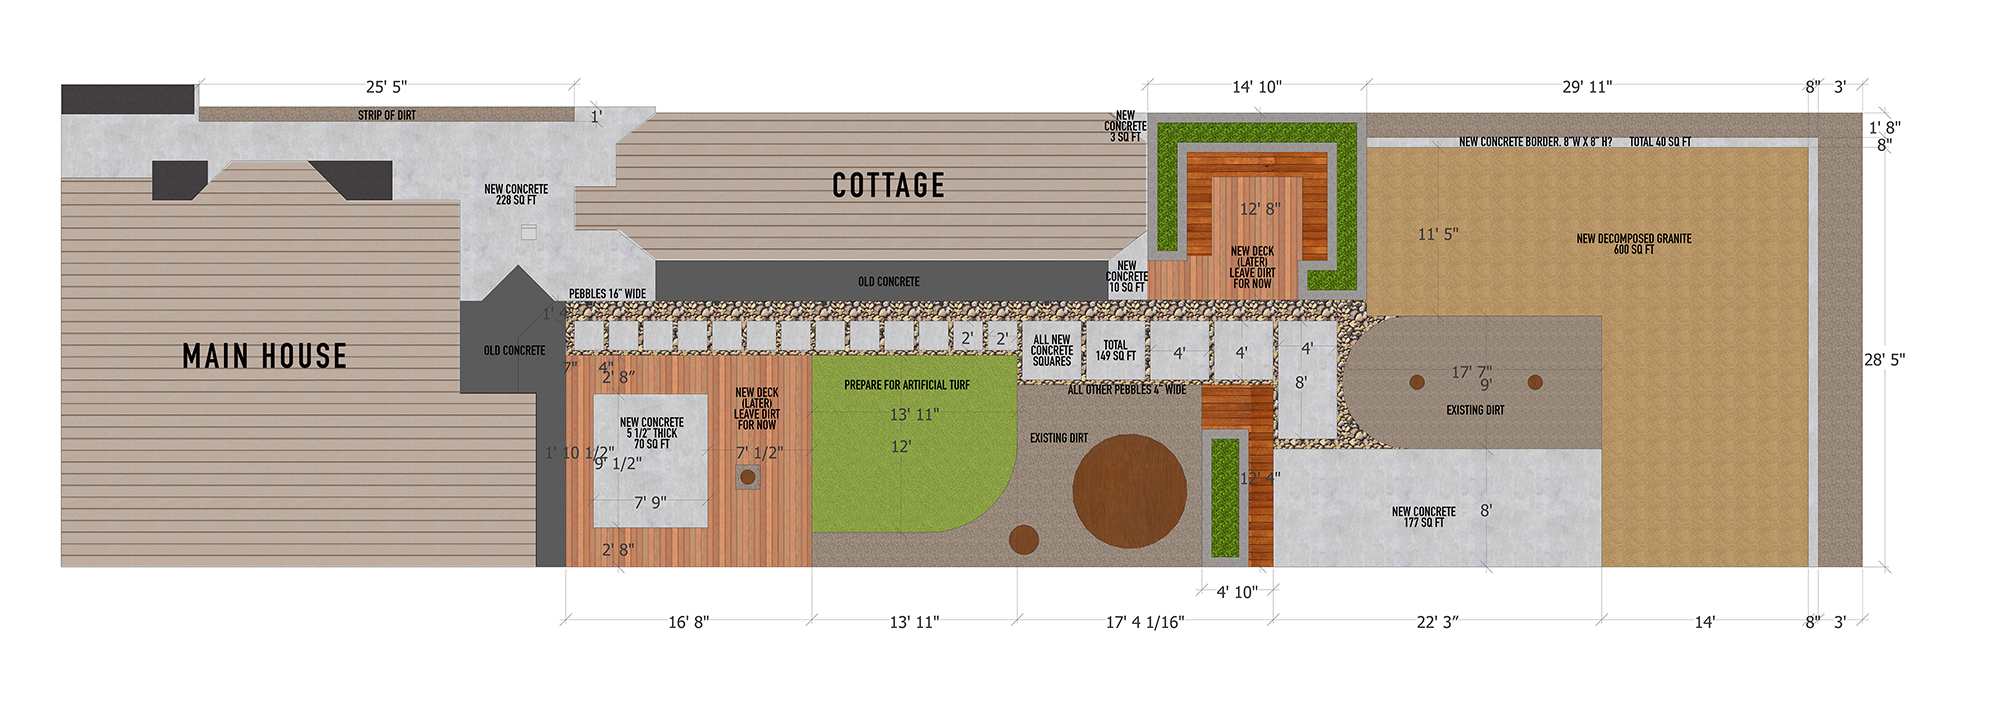
My plan was to create zones. Starting from the area closest to the main house, I would have a deck, then a fake grass area for lounging, then a second deck with build-in seating, then a concrete slab that I would use for building projects, and finally, a bunch of decomposed granite at the back which is a porous/non-permanent ground cover that I could put down for the time being until I’m ready for Phase 2. (Future art studio?!)

pin it!

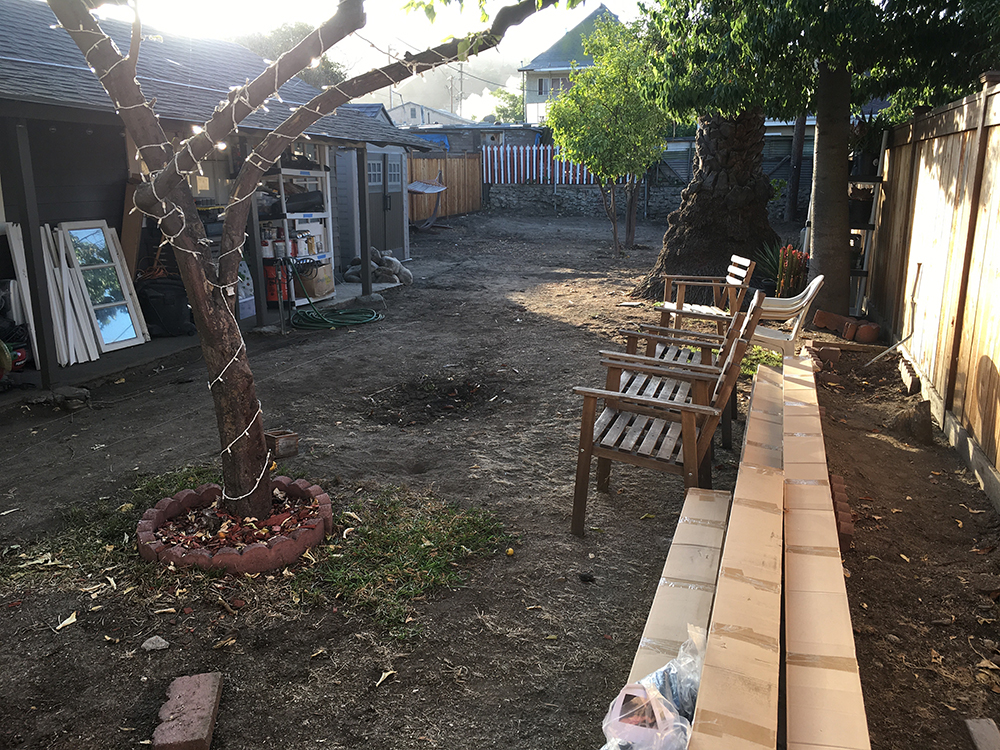
I didn’t know any landscape contractors at the time, and finding one who was available ASAP was a challenge. Most of the reputable companies weren’t available for two or three months.  I eventually found a contractor who was local and seemed to run a legit business.

I’m an extremely detail oriented person and I did so many drawings, sketches, and lists to convey what I wanted. From the beginning there were misunderstandings, changes, and additions, and my contractor definitely charged me for every single little thing.

pin it!

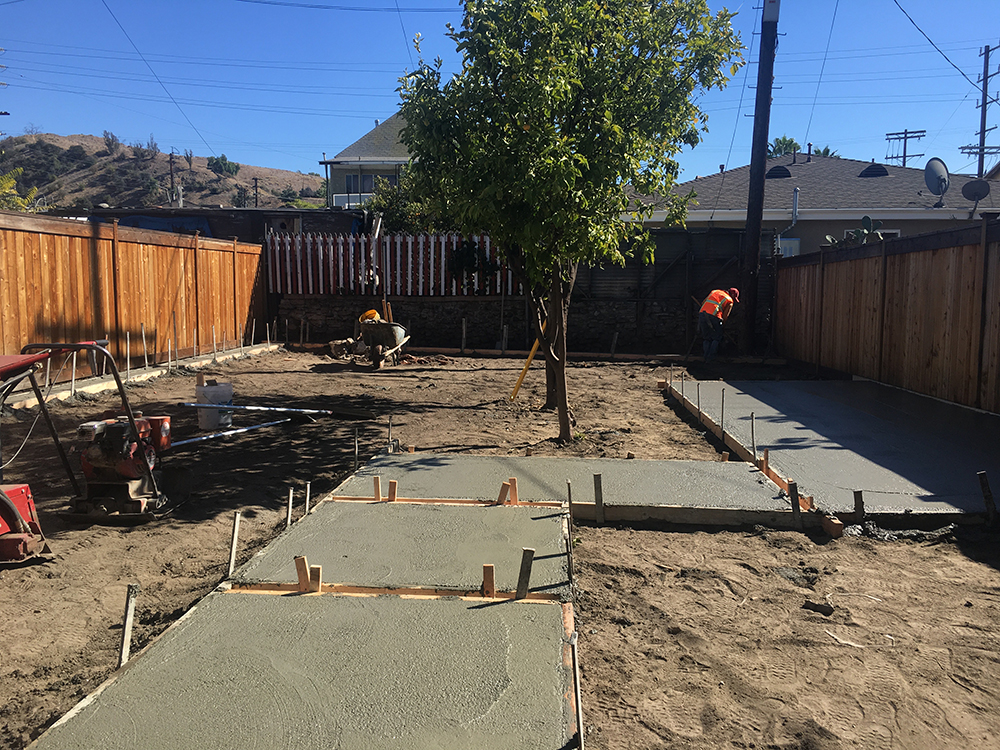
For example, I meticulously measured out where I wanted all of my concrete slabs to be poured. All of the forms were laid and the concrete was poured on the same day – a day when I was at work. I left during my lunch break to check it out and for the most part, it was all fine. However, I definitely told the contractor that I wanted him to make the yard all one level. He took that as me wanting the yard to be flat but at a slant,  and he went ahead and poured a concrete border along the entire back of my yard at an angle. When I came home from lunch, I freaked out because it looked ridiculous. The boss wasn’t there and I called him right away and told him that this was not at all what I wanted. We ended up having to demolish the freshly poured retaining wall and grading the soil which added $2k+ to my already huge estimate.
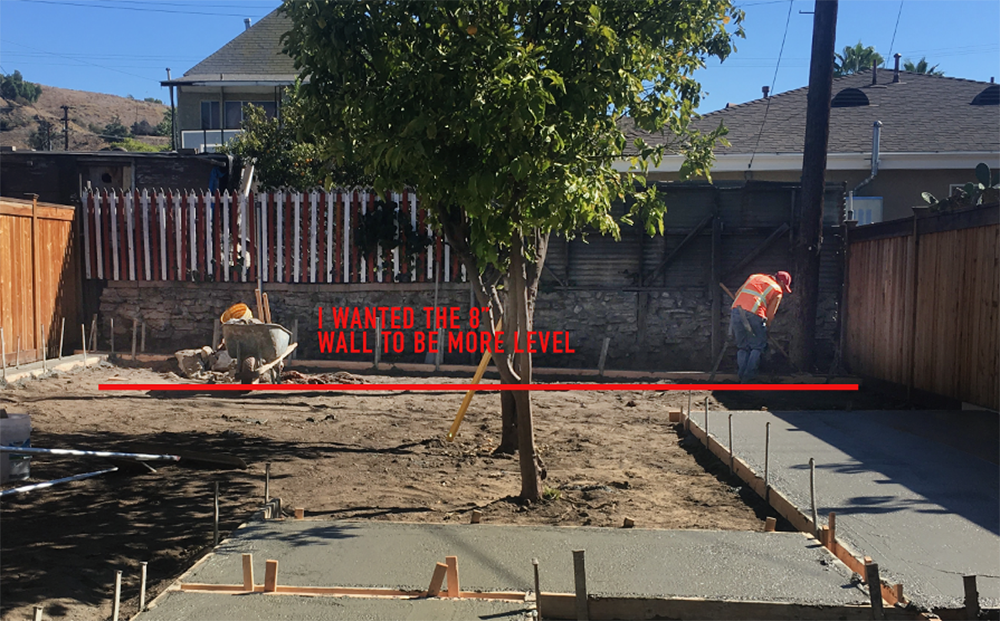
   pin it!

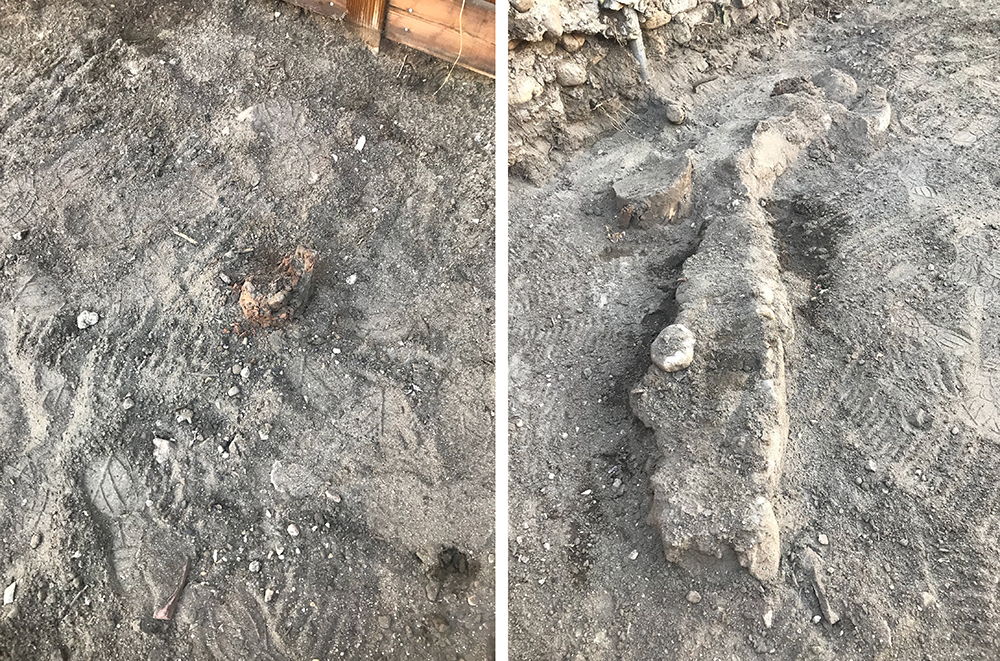
pin it!Every time my contractor would find the smallest thing in the ground like a tree stump or a small blob of concrete he would charge me $1000 to take it out. I mean, look at these blobs in the dirt. He actually charge me $1000 to remove them. The most annoying thing about working with a contractor is that once you’re neck-deep in all that mess, the only way to make the suffering stop is to get it over with. Contractors are in a very good position to charge exorbitant amounts for overages/additions because they know that the homeowner is somewhat desperate and feels like it’s too late to start over and form a new relationship with a new company.

pin it!

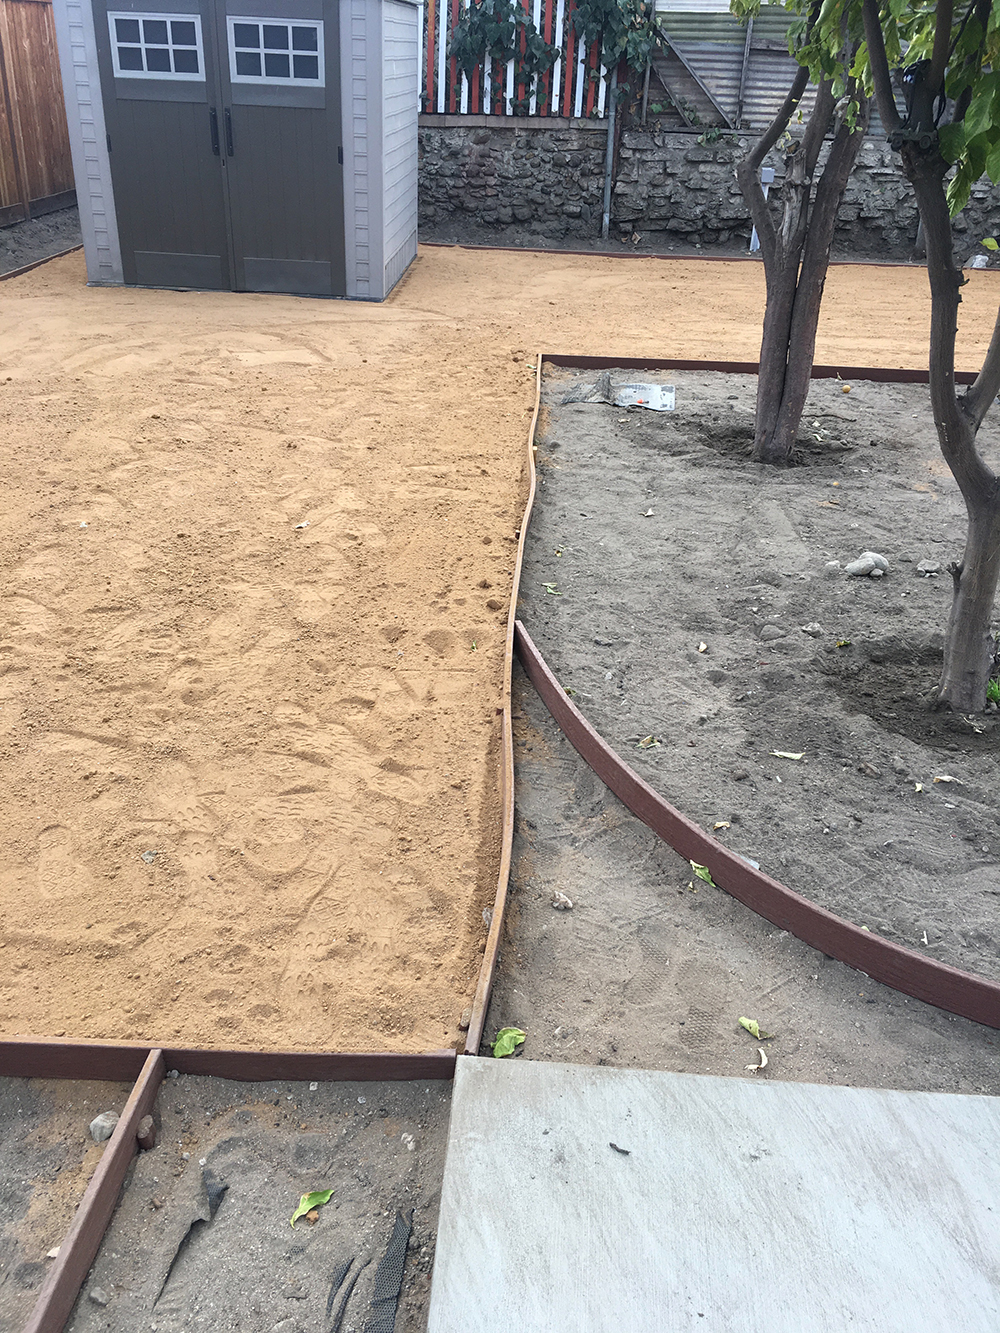
This is another example of my contractor charging me ridiculous overages. I asked him if he could obtain an install these plastic edge pieces in order to create delineations between the rocks/turf/decomposed granite (light brown stuff that running paths are made out of). He gave me a long speech about how he uses the best products so the project was going to cost $1800 for materials and labor. I totally fell for it. Once the edges were installed, I felt like they looked particularly wonky and cheap so I went to Lowe’s to see if they had anything that would be better for the job, and I come to find out that the product he installed was literally worth $100 and he charged 10 times that.

This is when I finally snapped and I decided to sever my relationship with my contractor. I ended up paying him 85% of what he charged me, but I refused to pay the last 15% because he was ripping me off. There were a lot of emails and invoices sent back-and-forth as well as threats of legal action on both ends, but ultimately he accepted my suggestion to take the 85% and end our relationship.

I do not think this contractor is a bad person, but he was one of those foremen who comes to the job site for 10 minutes in the morning, blurts some instructions to his team, and then leaves, and doesn’t come back until the next day. I’m not exactly sure how much better this would have been with a different company, but now I know that for me personally, I want to manage all large projects myself from here on out.

Once the contractor was gone, everything was pretty smooth from that point on. I did a lot of the work myself, but I hired specialists to do specific jobs (a turf guy to do the turf, an electrician to do the electrical.)  And then my AMAZING friends Jef and Michael came on board to finish the deck.

pin it!

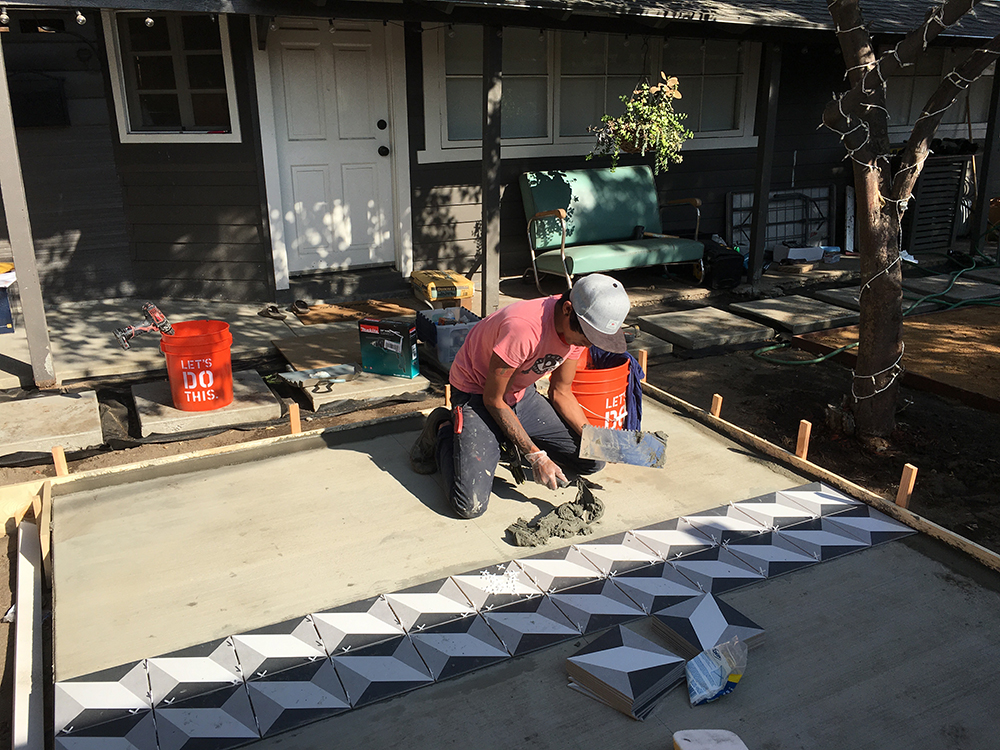
pin it!Jef and I tiled the concrete slab together which was relatively straight forward because we had tiled some stuff at my Richmond house a few months prior.

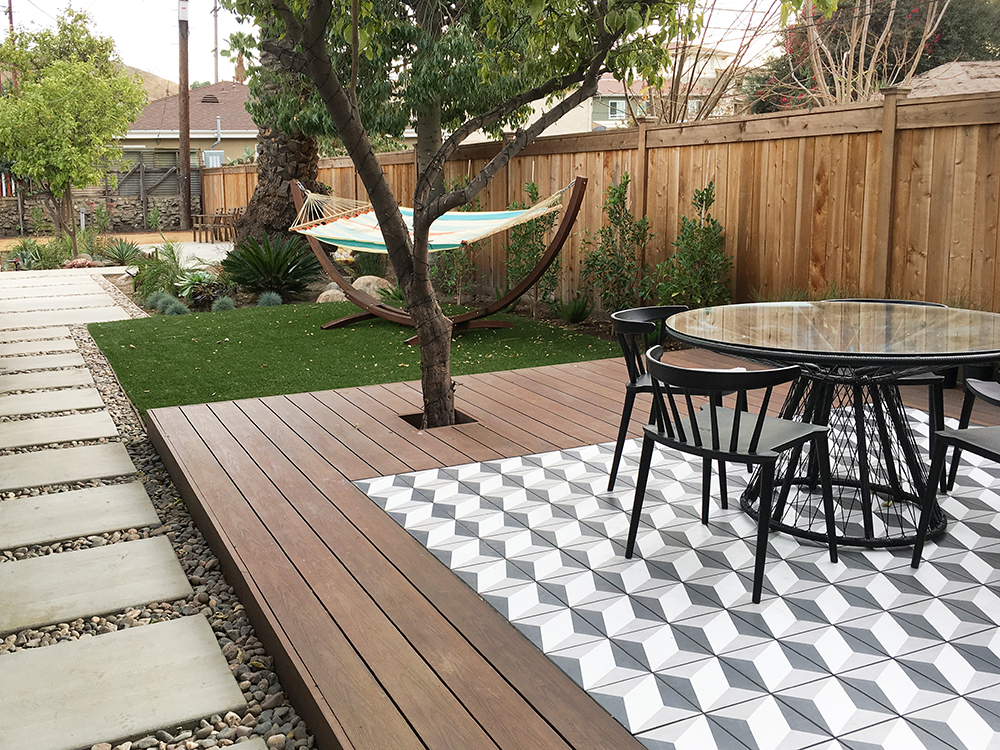
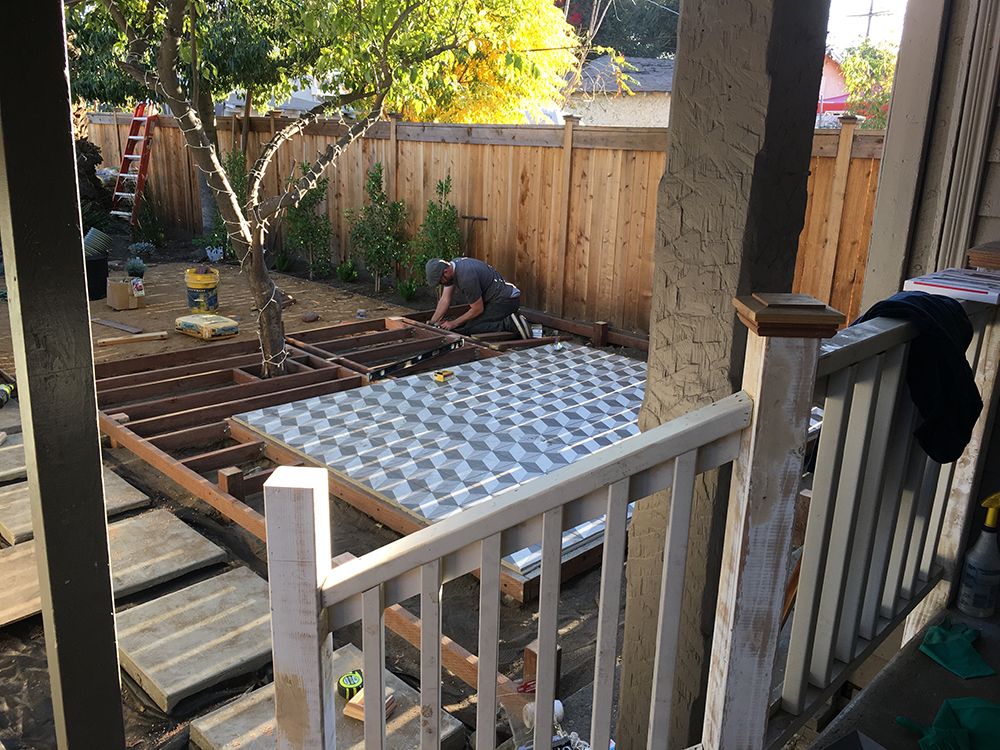
pin it!My brilliant carpenter friend Michael Forbes built the deck to my specifications. He even built it at a 2 degree slant for drainage and worked around my lemon tree! It’s perfect, I love it so much!

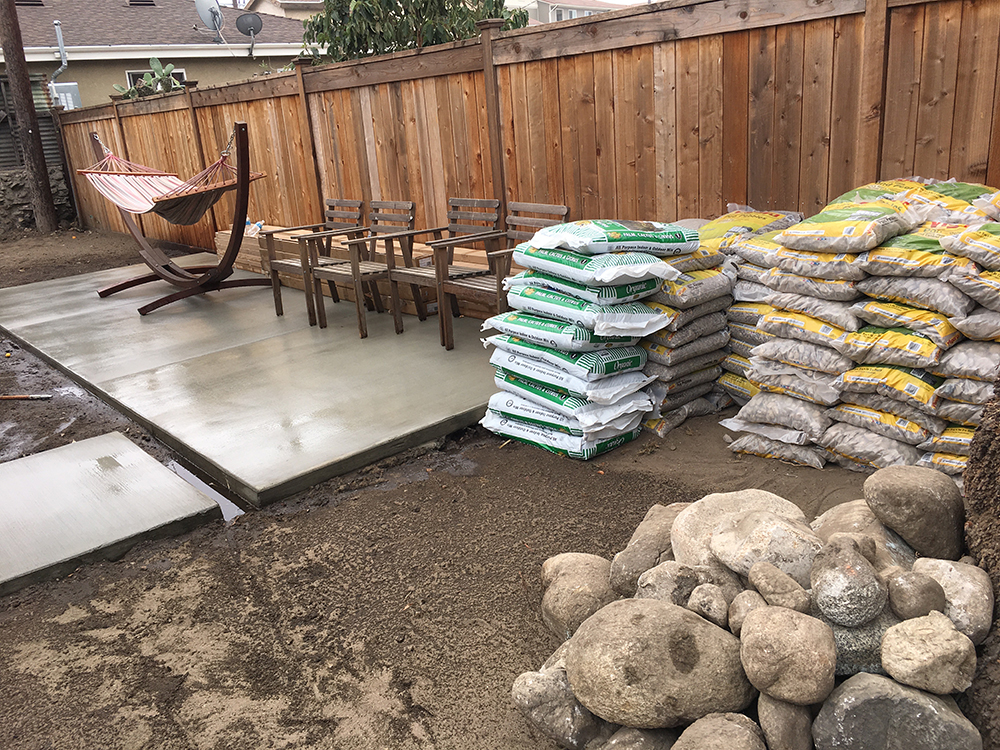
pin it!I had to haul 7000 lbs of landscaping rock to go between all the concrete pavers.That was a blast.

pin it!

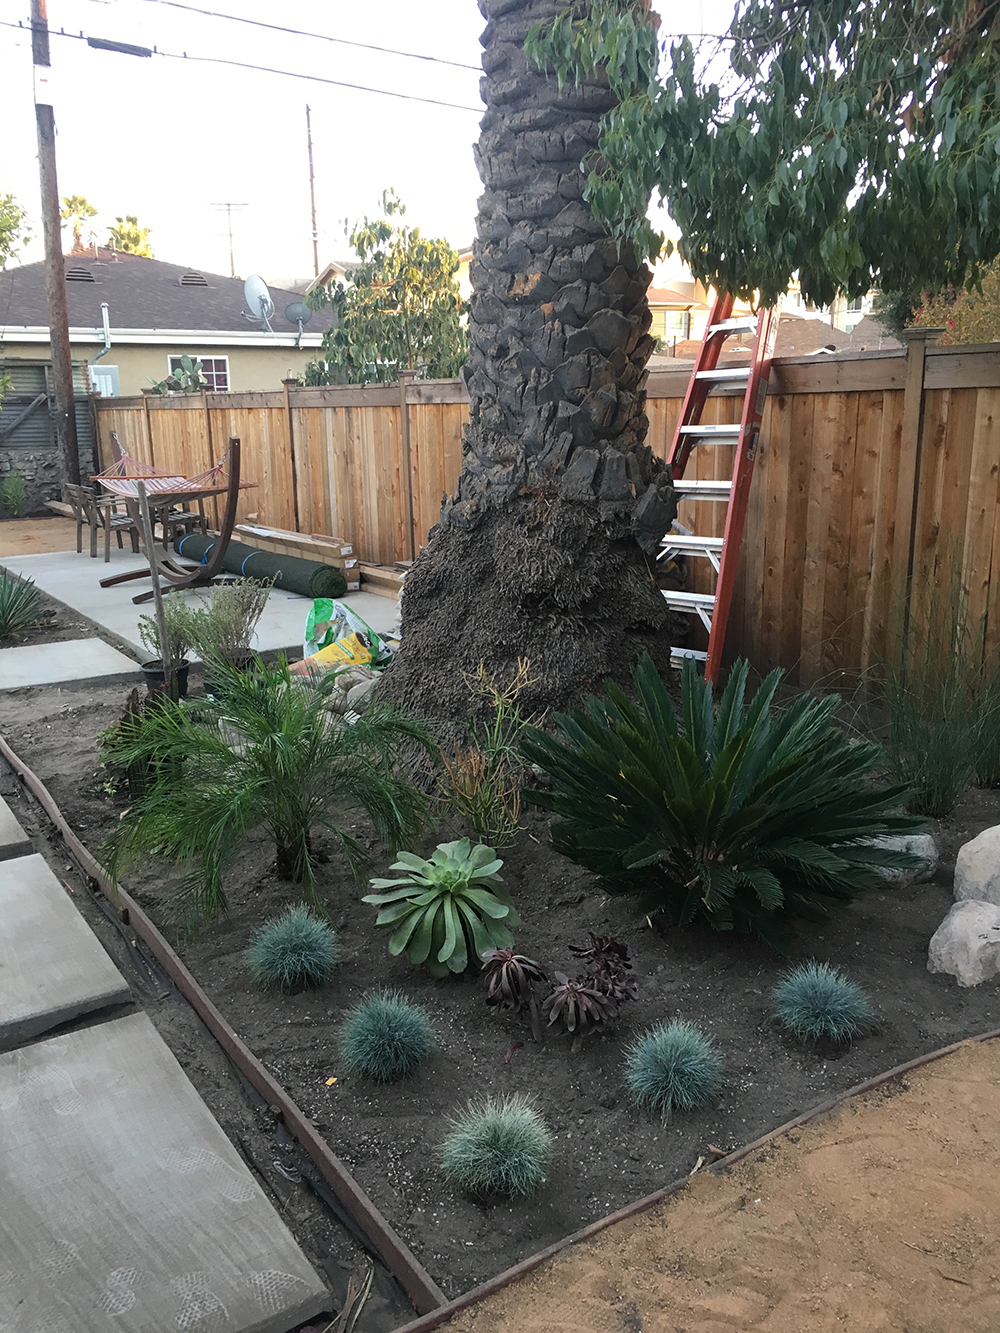
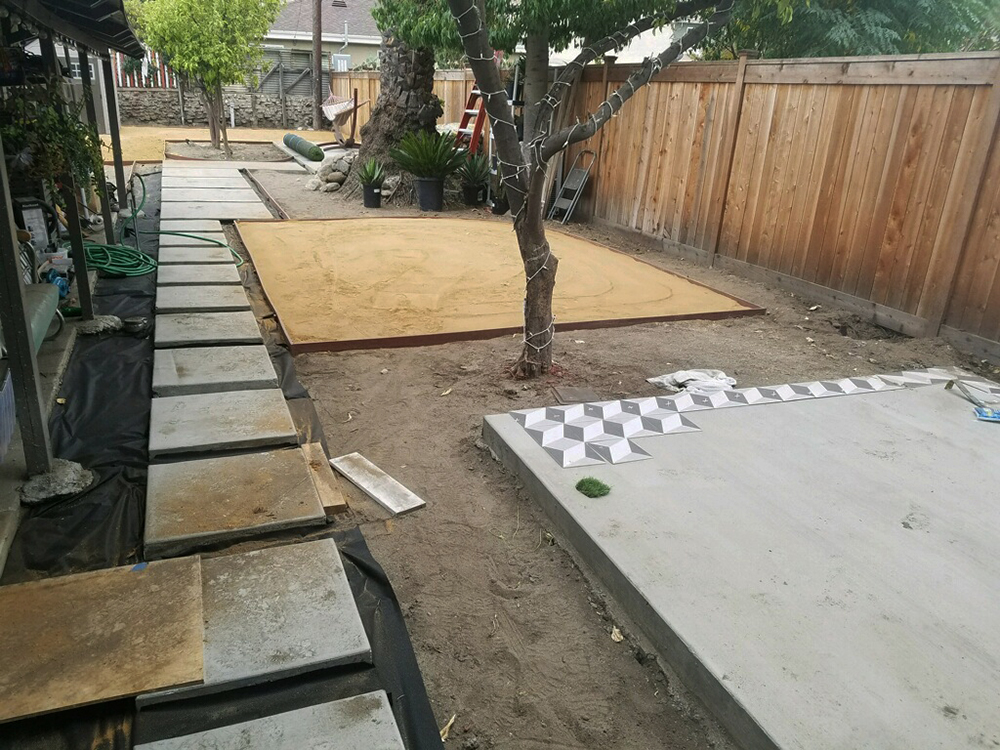
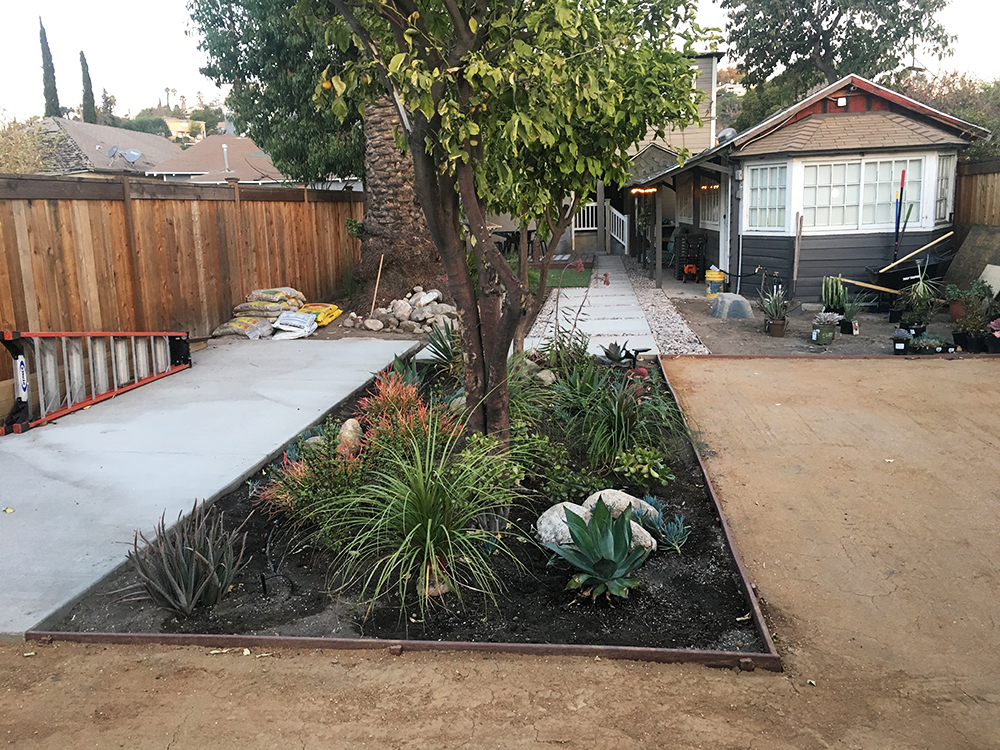
pin it!I bought a zillion plants and plopped them into the ground. This is a view from the back of my lot toward the house. I decided to hold off on deck #2 on the right because I was hemorrhaging money faster than I was earning it.

pin it!The actual renovation took about a month, and despite being the #1 MOST ANNOYING RENOVATION PROJECT of my career so far, I’m really happy with how it all turned out. A few big lessons that I learned:

1) Level and flat are two completely different things, and when you’re talking about that in a landscaping context, you have to be ultra clear what you’re trying to say.

2) Whatever you think your landscaping budget is, DOUBLE IT. And then double it again.

3) Just because someone says they “can do everything,” that doesn’t necessarily mean that they’re great at everything or will give you a fair price. Contractors outsource, too and mark up everything. It may be worth it to find your own specialists to come in and perform the service that they advertise, even if it’s more work.

4) Try to be at the job site as much as possible. I’ve been working in the business of designing/building for 13 years, and I’m still surprised how often mistakes are made by all parties. Also, if you have to hire a contractor to manage a project, ask if that person plans on being on the job site regularly.

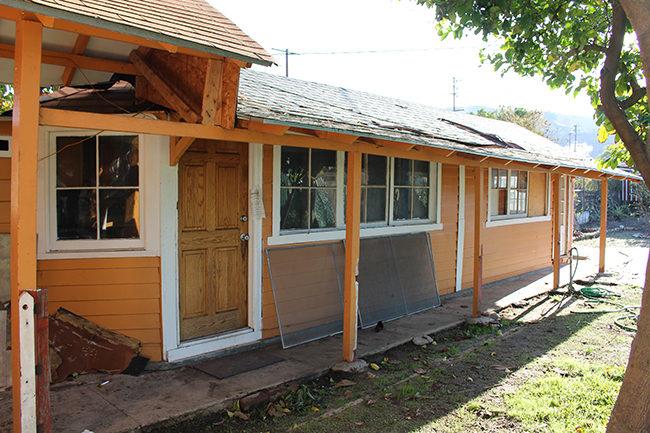
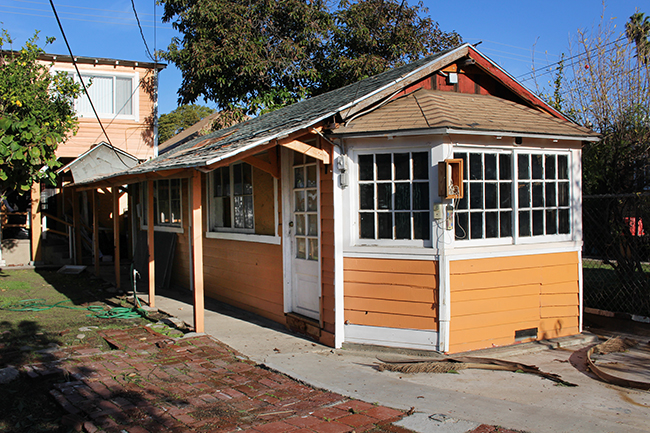
Changing topics: I also renovated my front yard! And the exterior of my cottage! OMG so many things to share. More to come. XX

Posted by Jen at 12:02 pm — comment
Categories:
Jun 4

The California Cottage: Bathroom Renovation!

01pin it!

I don’t watch a lot of TV — probably only about an hour per week. I recently signed up for HBO Now just so I could watch Lemonade, and I’m slowly making my way through the 6th season of Girls, but that’s about it.

However, when I travel for work and stay in a hotel, I binge watch HGTV like a crazy person. It doesn’t help that these days, networks are all about playing 4-8 episodes of the same show in a row, so I find myself up until 2am watching re-runs of Fixer Upper until I’m dazed and bleary-eyed. I can’t help it. I LOVE a good before-and-after. The more tragic the better.

03pin it!

When I bought my house, my cottage bathroom looked more or less like a dilapidated prison cell. The “walls” were made of flimsy water damaged panels, the floor was rotted through, and the window was corroded. Most infuriatingly, the toilet was oriented the wrong way, so when I sat on it my knees would bump the sink pipes. What crazy person thought that this was a good idea?!

Somehow I managed to tolerate (and use!) this mess of a bathroom for an entire year.  There were times when tried to convince myself that it wasn’t so bad. “Maybe I’ll keep this little sink…maybe the tile around the tub can be refreshed without replacing it…maybe I don’t mind the fact that I can prop my feet up on the tub when I’m on the toilet.” But then one day I was just like, “I hate everything. Everything out, out, out!” So I dragged all of my bedroom furniture into my living room and just camped out there for the next 2 weeks while chaos ensued.

04pin it!

05pin it!

First thing first… demolition. I got rid of everything but the tub.  I hired a guy to help me with the demo, plumbing, and electrical. I never would have been able to handle a renovation like this myself.

The bathroom is tiny (only 5 feet wide) so I wanted to keep it as open and airy as possible. I initially envisioned a bold black and white tile floor like this. I even bought the tile a year in advance and hoarded it in my shed in anticipation for the big reno. When it finally came time to put the new floor down, I had second thoughts.  I was concerned that the high contrast would be too jarring. I kind of wanted the flooring to flow form the bedroom into the bathroom. The floor in my cottage is laminate which is not recommended for wet areas, so I scoured a few local tile shops to see if I could find a porcelain tile to match. I got pretty lucky. The 2nd place I checked was called Tile Depot and despite its ho-hum name, it was actually tile heaven. Beautiful showroom, nice sales people, good prices.

02pin it!

My new found tile helped me solidify my vision for the space. My handyman I worked 8-10 hours/day for 2 weeks on this tiny bathroom. Not gonna lie, it was hard!

06pin it!

After the new sub floor went in, we put in new drywall. The room was feeling a little plain, so I did what any Fixer Upper viewer would do — I installed shiplap (or rather, fake shiplap made of luan strips.) I realize shiplap is kind of trendy right now, but I DO live in a cottage, so it felt like the appropriate thing to do.  I’m so glad I painted the slats first, because even though the gaps are only as thick as a nickel, you can definitely see them at eye level.

07pin it!

By the time the ship lap was done, I was feeling pretty confident and decided to tackle the tile floor myself. You’d think that a small 5′ x 5′ floor would be no sweat to tile, but let me tell ya…tiling a small bathroom is HARD. There was barely any room to move in there which made every step of the process so frustrating. I was also using a ton of mortar so that my porcelain tile would be perfectly level with the laminate floor in the adjacent room. Apparently mortar is SUPER heavy and really tiring to mix even with a drill and mixing attachment. Who knew?!

08pin it!

The tiling never really got easier. It was frustrating till the bitter end. I was definitely relieved when I made it around the toilet hole, though.

09pin it!

How many cuts does it take to cut a circle in the shape of a toilet flange out of tile? Only about 35. Unless your first tile snaps, then you’d need 70. :(

10pin it!

Grouted and sealed! Honestly the floor was a huge pain and while I was doing it, I kept saying that I wouldn’t tile a floor myself again.

13pin it!

My favorite project to do in any renovation is trim/moulding. It’s always a good sign when you’re ready to put the trim on. That basically means you’re almost done!

11pin it!

Just when I thought I was ready to put on the last piece of trim, I realized that because my overall floor is a little slanted (and always has been) my simple baseboard looked super crooked. I wound up having to buy a larger piece of lumber and cutting it at an angle to compensate for the slant. Ugh.

12pin it!

This was also my first attempt at installing subway tile in a real interior (as opposed to on a set.) The subway tiles are small and light enough that they’re relatively easy to install. I just did all the math first, then tiled in sections starting from the bottom. The best part about subway tile is that you don’t have to use any spacers. They are designed to have a 1/16″ gap between each tile. I would definitely consider doing subway tile again by myself in the future, because it’s on a wall as opposed to the floor.

14pin it!

So the bathroom is done now! I’ve lived with it for a couple months now, and I couldn’t be happier. This is my first time having my very own brand new bathroom, and it makes me feel kind of fancy, even though it’s not a fancy bathroom at all.

15pin it!

16pin it!

17pin it!

Sources:

sink and vanity: IKEA YDDINGEN/LILLANGEN

sink faucet: Amazon Derengge

mirror: IKEA GRUNDTAL

small metal shelf: Container Store Simple Ledge Shelf

toilet: Home Depot American Standard

wall hanging: Heather Levine Ceramics

shower/tub hardware: Amazon Kingston Brass

subway tile: Home Depot Rittenhouse

floor tile: Tile Depot Rosemead


Posted by Jen at 1:22 pm — 1 comment
Categories: , ,
Sep 30

The California Cottage: Progress on the Kitchen.

In the 90s, most kitchens looked more or less the same — medium brown cabinets with brownish Formica or granite countertops. Sometime in the late 90s, the “great room” became a must-have for modern families and people were knocking down walls left and right to integrate kitchens with living space. The popularity of the great room lead to the rapid proliferation of the statement kitchen. Nowadays if you do any kind of kitchen image search, the variety of styles and materials that people are using in their kitchens is mind bogging and inspiring.

Kitchens are my favorite room in the house to design. I’ve always been obsessed with space planning and maximizing efficiency, so I was excited to overhaul the dumpy kitchen in my cottage. When most people think “cottage,” they imagine a space that is kind of rustic, warm, and maybe a little shabby-chic. As a design experiment, I veered away from a traditional cottage look and went for a more Scandinavian look, using really clean lines and stark color contrast.

04.2pin it!

I bookmarked a few images that tugged at my heart strings — all really bright and clean with a heavy dose of black and white. My kitchen is small and doesn’t get a ton of direct sunlight so the logical decision would have been to do white cabinets, but I had a hard time getting excited about an all white kitchen. I knew I was going to use Ikea cabinets and all of their white doors were either too plain, too traditional, or too glossy.  I hemmed and hawed about it for months and by the time I was finally ready to pull the trigger on cabinets, they came out with a new dark black-brown cabinet door called Tingsryd that has a subtle dark gray wood grain that ran horizontally. I was seduced by the idea of the high contrast, but I didn’t want to make the kitchen too heavy, so my solution was to do ONLY lower cabinets, concealing all of my food storage and appliances below the countertop.

01pin it!

This was my dumpy kitchen before. (It was a lot grosser in real life.) There was about 15 years worth of cooking grease and spider web build up. I planned on leaving the plumbing and gas lines in the same place.

02pin it!

03pin it!

One of my biggest issues with this space was the windows. It drove me nuts that they all had different mullions—4 paned, 6 paned, and 9 paned windows all along one wall! It took a bit of sleuthing, but I figured out that the 4 paned window originally belonged in the back of the cottage in the bedroom, the 6 paned window originally belonged in the dining room of the main house but was removed to accommodate a window a/c, and the 9 paned window was just some random one-off that didn’t match anything on my property.

04pin it!

I demolished the kitchen myself. Whoever installed the previous kitchen used about 1000 screws and nails to fasten the cabinets to each other and the walls. It was not an easy feat, but eventually I managed to rip all of the cabinets out. I threw away the weird triangular cabinets that fit in the angled part of the bay window. I kept the cabinets that were still in tact and moved them to my shed to use as storage.

06pin it!

I pulled out the window in the center because it drove me nuts that there were 3 asymmetrical windows. I planned on covering that gaping hole with drywall and wood siding on the outside. I also ran laminate flooring across the entire room before bringing in any kitchen components. 

07pin it!

My amazing friend Michael helped me install the kitchen. There were some complex/funky angles in this project and he made my narrow rectangular cabinet in to 90-degree trepezoid cabinets like the one you see on the left!

08pin it!

I splurged on quartz countertops. I’m a messy artist at heart, and I knew that I would need a relatively indestructible countertop to stand up to my abuse. You can’t really tell in this pic, but the quartz is warm white with tiny speckles in it. I love it.

09pin it!

I wanted SO badly to have a matching under cabinet fridge and freezer, but because of the space constraints, that just wasn’t possible. It doesn’t really bother me, though because both of these are concealed behind doors.

10pin it!

We installed a small sink, 24″ gas stove, and Michael framed out my window openings and made me new custom windows :).

12pin it!This is more or less what the kitchen looks like today. Ain’t it pretty? My pulls are black, so you can barely see them. I need to put a door over the microwave, but it’s a weird size, so it needs to be customized. Hopefully I’ll have time to do that soon. Now I’m trying to decide on a backsplash material. I love this tile that I saw at home depot because it looks A LOT like my floor. But is it too plain? I’m also auditioning other crazy patterns and materials. More on that in the next post!

Posted by Jen at 5:17 pm — 2 comments
Categories: , ,
Mar 23

The California Cottage: Invisible Work.

Hi guys. I’m alive. My dumpy cottage is looking pretty awesome (at least to me), but it probably looks so-so to everyone else because most people didn’t see how tragic it was before I started the renovations. (SO tragic, that my friend Sue insisted that I refer to it as a “shack” rather than a cottage.)

My roommates and I recently had some people over for a BBQ and a lot of folks asked me, “So what kind of renovations have you been doing?” My response: “I’ve basically been spackling for 12 hours/day for the last month.” NO JOKE.  Allow me to share some details shots of the the general crustiness and you’ll get the gist.

wtfpin it!

I can’t tell if the people who built/renovated this place cared a lot (by installing a cove ceiling, bay windows, etc), or just didn’t give a s**t (as illustrated by the images above). I knew what I was getting into when I bought the place, and I am comfortable with “extreme cosmetic repair,” so that’s what I’ve been doing for the last 2 months. It’s really not fun at all, but it’s satisfying enough that I’m willing to do it just to see it done.

I’ve been wanting to share some progress pictures, but the truth is… for a long time there wasn’t really much to see — just a bunch of bad iPhone pictures of dirt and spackle.  I’ve been doing a lot of what I call “invisible work” — meticulous, mundane, time consuming, not-exciting work that includes:

-demo and cleaning

-installing new drywall

-smoothing out lumpy walls and trim

-re-hanging doors and windows so they open out, rather than in,

-repairing busted windows

-spackling, patching, painting, and repeat, repeat, repeat until my arms fell off

At this point, the bedroom is 80% done, the living/dining is 65% done, and the bathroom is just terrible, so let’s not talk about it. Since the bedroom is looking the most presentable of all the rooms, I’ll start by showing you some pics of that first.

001pin it!

If you read my last blog post, you may remember this “before” photo.  The paneled wall on the right was kind of spongey and I couldn’t resist peeling back the layers to see what was back there.

002pin it!

003pin it!

Behind the wood paneling was… 50’s drywall? I’m not sure what they used to make walls out of, but this stuff was kind of soggy and crumbling too and covered in 2 layers of textured wallpaper, so I took a crowbar to it and found…

004pin it!

The original wood plank for the cottage! This is both the interior and exterior wall. Obviously, this had to stay, but there was definitely some termite damage, so after I demolished all of the old drywall, I rolled on 3 coats of this green foamy wood preservative that is supposed to inhibit termite damage and rot. It seemed to cover really well, but it smelled like death, so if you plan on using it indoors you definitely can’t live in a space and use this stuff at the same time.

006pin it!

After a few rounds of DIY termite damage control, I hung brand new drywall. Basically all the walls around the perimeter of the cottage had to be re-done, but the interior walls (bathroom/wall separating the bedroom and cottage) were fine and just needed some patching.  Oh! I also built a new door frame for my bathroom door. That’s the fun stuff that I actually enjoy doing.

007pin it!

Now that everything is primed, it looks and feels so CLEAN. The new walls basically took 45 years off this place. Oh, and I painted my ceiling pink! WHO AM I?! Don’t worry, I’m wallpapering this room, so don’t judge my poorly cut paint lines.

Annnd… that’s all I have for you for this side of the room. It hasn’t really evolved much since. In fact, I took the door off for repair and painting, so in a way, this corner is looking even worse than it does in this pic. MOVING ON!

01pin it!

This is the other side of the room. Whoever installed the bay window stopped short of completion and it just sat there looking sort of sad for decades. At some point someone used this nook as a closet, which is creative, but… NO. This little corner needed A LOT of love.

03pin it!

First, I took off the drywall to see what was underneath. The bay was encased in plywood that was relatively flush and in okay condition, so I slathered joint compound on it, sanded, slathered, sanded, then built a little window sill.

05pin it!

The bay window had a soggy ceiling that had some small holes and cracks.  I briefly contemplated just patching over it, but then curiosity got the best of me and I decided to smash my hammer through it just for kicks and before you know it, I had to rip the whole thing out and re-drywall that too. More spackle, more sanding, more paint. OH THE JOYS.

07pin it!

This is the bay, nearly ready for paint. I sanded down the blue because it was lumpy and the blue paint had poor adhesion to the layer of paint beneath it. I added baseboard, ripped 1000 staples out of the windows, and patched those too.

08pin it!

BUT LOOK! As you can imagine when I FINALLY got to prime this wall, I nearly jumped for joy.

09pin it!

And then, friends, this is why I do what I do. By the time the patching and painting was done, I was feeling zen and decided I could handle installing floors myself. I took my time with it and made sure to be super precise with my cuts, and it was actually not a terrible project to take on by myself. I bought the flooring from Best Laminate after auditioning literally 25 different shades of white/gray and I am LOVING the color. This is exactly what I wanted. Something a little rustic, but also a little modern and Scandinavian.

10pin it!

I moved my bed in, and though it still needs furniture, curtains, and wallpaper, it’s totally cozy and livable. I don’t want this post to get ridiculously long, so I’m going to stop there and post updates on the living/dining area next time.

Posted by Jen at 8:49 pm — 3 comments
Categories: , ,
Jan 13

The California Cottage: Befores & Inspirations.

This blog post is about Los Angeles, which I consider my second city. But let’s talk about Brooklyn for just a minute.

There is one thing that unites all Brooklynites. Whether you grew up here or moved here later in life, at some point during your residency in this beautiful borough, one particular thought has undoubtedly crossed your mind—wouldn’t it be grand to buy a brownstone with 3 units so I can live for cheap in one unit while renting out the other two?!

We’ve all heard the stories. Everyone knows at least one person that had the foresight to buy a building 23 years ago when the streets were mean. Unfortunately, 23 years ago, I was 7 so that never panned out for me, but there isn’t a day that goes by that I don’t long for one of these beauties:

pin it!

I mean… DROOL. What’s not to love? I’ve been saving up for roughly 10 years now. With what I have saved so far, I would just need another $80,000 cash to fall from the sky, and I’d be good to go! And maybe another $65,000 for renovations. Hmmm…

Since I’m impatient and happen to be DYING for a new project to sink my teeth into, I decided to get the next best thing:

IMG_2932pin it!

I know… you can say it. She’s an ugly baby. I mean, she’s cute to me, because I’m going to nurture her and love her forever, but you don’t have to lie to me and tell me that she’s cute. I think of her as a “late bloomer” who is going through an awkward stage right now, but one day she’ll be a swan and she’ll wind up on the Bachelor. Just wait and see.

A bit of backstory: I went to school in Southern California, so all of my friends from college as well as a handful of my childhood mates all live in Los Angeles. Show business is my bread and butter, so more than half of my colleagues are in LA as well. I find myself out there several times a year for work and leisure, so I decided to find a dumpy little place to fix up and call my own.

By now, most of the folks reading my blog know I love a tiny space. My mini room in Brooklyn meant the world to me, and the process of renovating it jump-started my career and the finished product received some favorable press. That was 7 years ago (omg, I’m old) and I’m starting to feel like one of those artists who’s running on the the fumes of their one-hit-wonder. Ive worked on plenty of fun projects for work, but my personal space hasn’t changed in a few years and it’s slowly sedating my spirit. It’s time to get back into the studio.

cottage_floorplanpin it!This 1940s structure is a 1 bedroom/1 bathroom back house behind a bungalow from 1908. I’ll get into the details of how it relates to the rest of the property later, but for now, here’s a floor plan so you can decipher the “before” photos. Doesn’t it look like an old school NYC subway car?

cottage1pin it!As soon as you enter, you walk into the kitchen. I plan on overhauling it, but I’ll leave the sink and stove in the same place.

cottage2pin it!This is the living room window looking toward the bedroom.

cottage3pin it!There’s a full bathroom but no closet. I’m going to build or buy a tall wardrobe to put against this wall.

cottage4pin it!I’m actually charmed by these crusty hand-made windows. The exposed/stained drywall and wood paneling…not so much.

cottage5pin it!Busted/missing windows. General filth and grime everywhere.

cottage6pin it!

I haven’t even touched the cottage yet, but I’ve invested approximately 6,798 hours into dreaming about how glorious it will be. I break ground this weekend, and I have to tackle the boring dirty work first. (Rip up linoleum, replace sloping subfloor, rip off wood paneling, patch drywall, gut kitchen, clean, clean, and clean…) It’ll probably be a few weeks before I start on the fun stuff, but for now, this is what I’m thinkin’: cottage_boardpin it!It’s a lot of scandinavian/modern with a sprinkle of industrial/Moorish. I want to be really good about documenting all the major projects so I can share the progress with you. I haven’t been this pumped about a space in a long time. Wish me luck!


Posted by Jen at 1:41 pm — 5 comments
Categories: ,