Jan 31

The California Cottage: Backyard Overhaul AKA the Most Annoying Renovation Ever.

pin it!My small house is on a very large lot that is only 25 feet wide but almost 200 feet long. The lot is flat, so all the land is 100% usable for pretty much whatever I want — a veggie garden, a pool, an art studio… so many possibilities. I always knew that this yard had huge potential but landscaping is exorbitantly expensive so for the longest time I just didn’t have the willpower or the funds to make something like that happen.

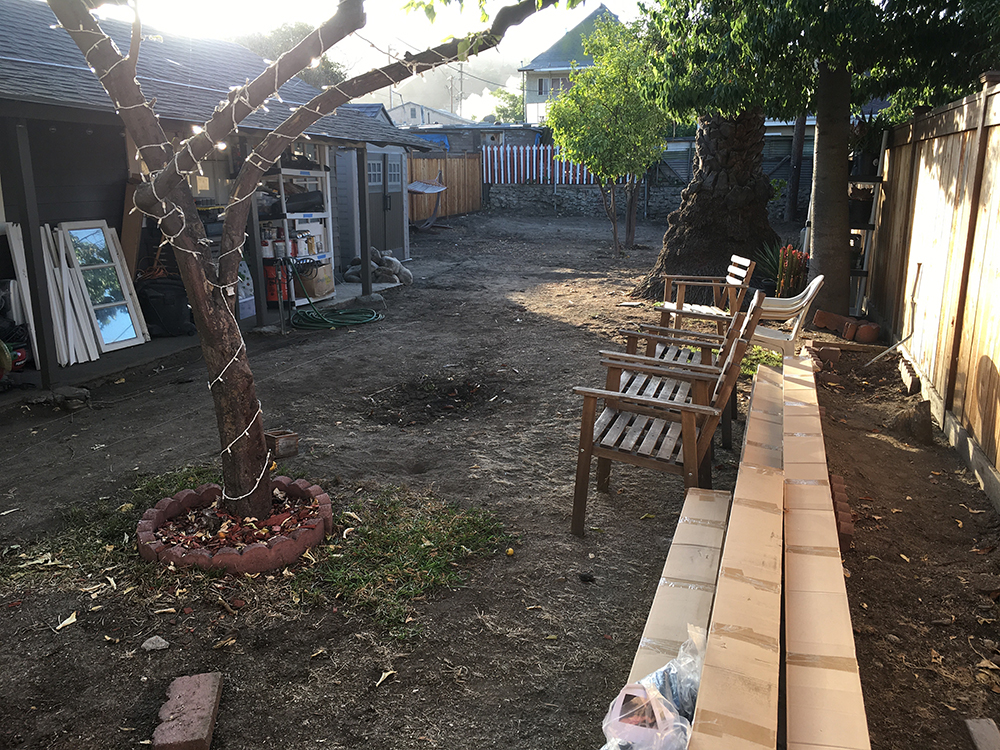
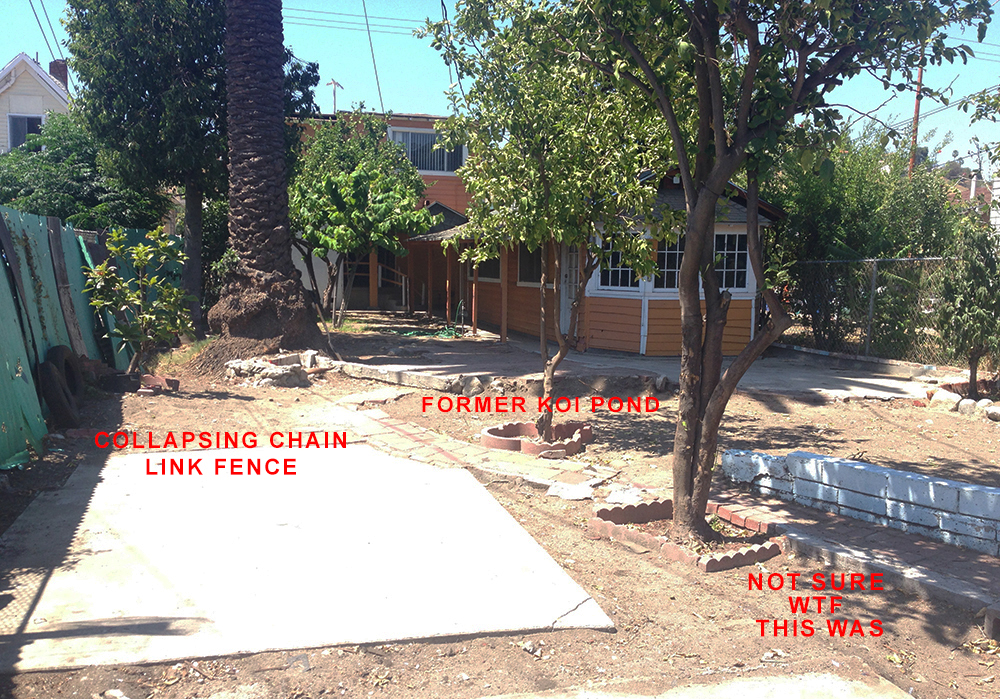
My front yard and backyard were a massive eyesore. The chain-link fence was falling over, the grass was all dead, and the cement walkways were poured badly and looked terrible. The previous owners had a KOI POND at some point, which resulted in awkward hills and valleys as well as all kinds of weird concrete and brick debris.

The little cottage that I live in is tucked in the backyard of my property. It has 14 windows, 13 of which looked out onto my dirt-blob yard. For years I just kept the blinds drawn to avoid looking at it, but as soon as I had the money saved, I decided to start designing.

pin it!

My main motivation for her embarking on this yard renovation was to manage the dust. Los Angeles is in a drought most of the time so the soil here has no weight to it. Every time the wind blows, tons of dust flies all over the yard and somehow ends up all over the inside and outside of my yard. No matter how much I swept there was no controlling the dust.

pin it!

The first step was to hire somebody to demolish all the little bits and pieces of leftover projects so we could start with a blank slate. I can’t decide if that made it look better or worse.

pin it!

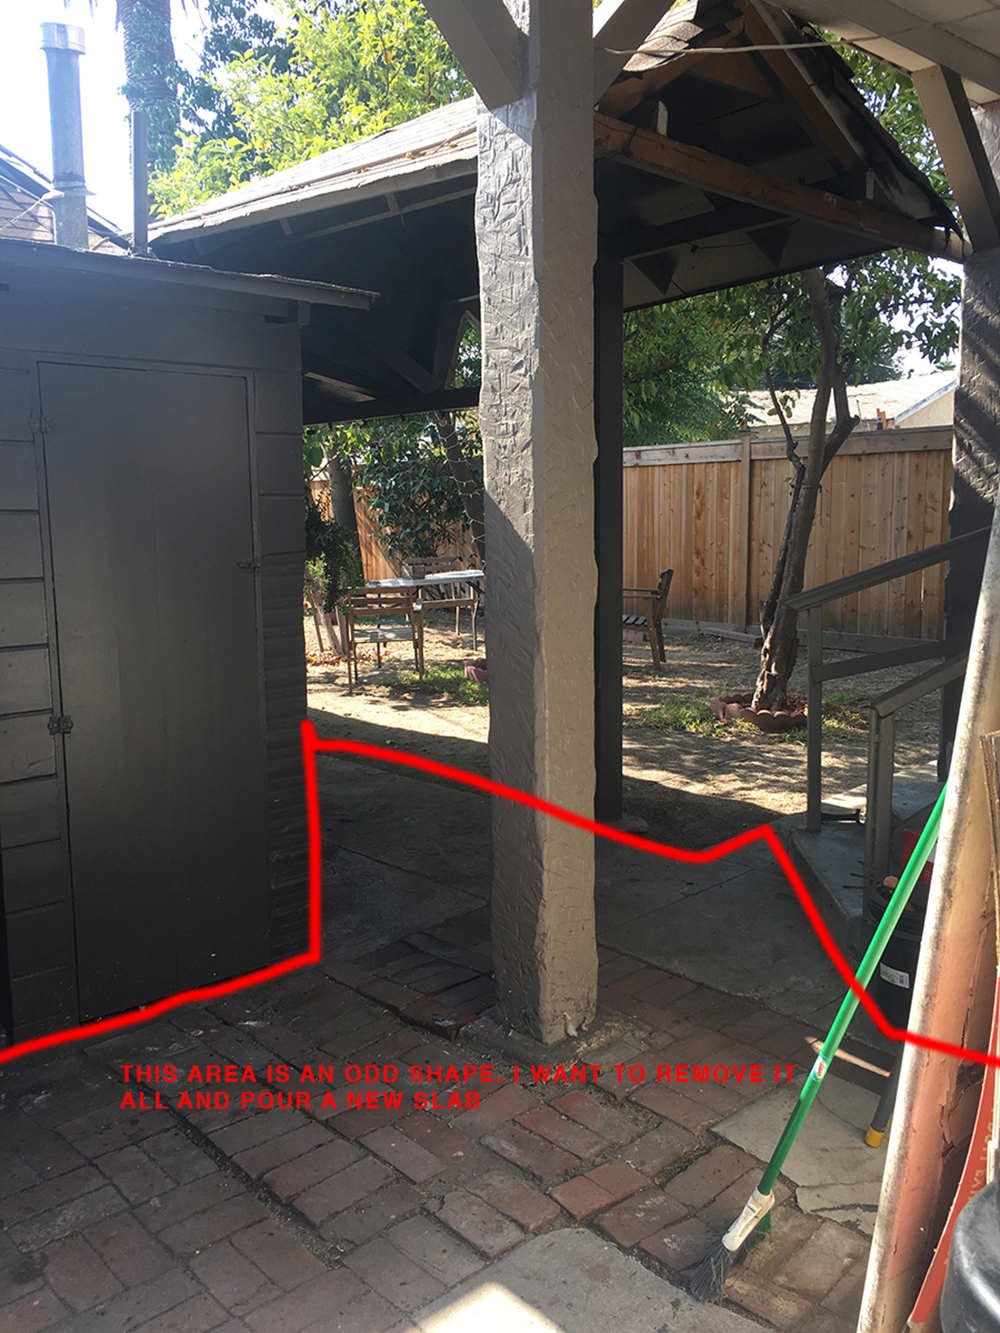
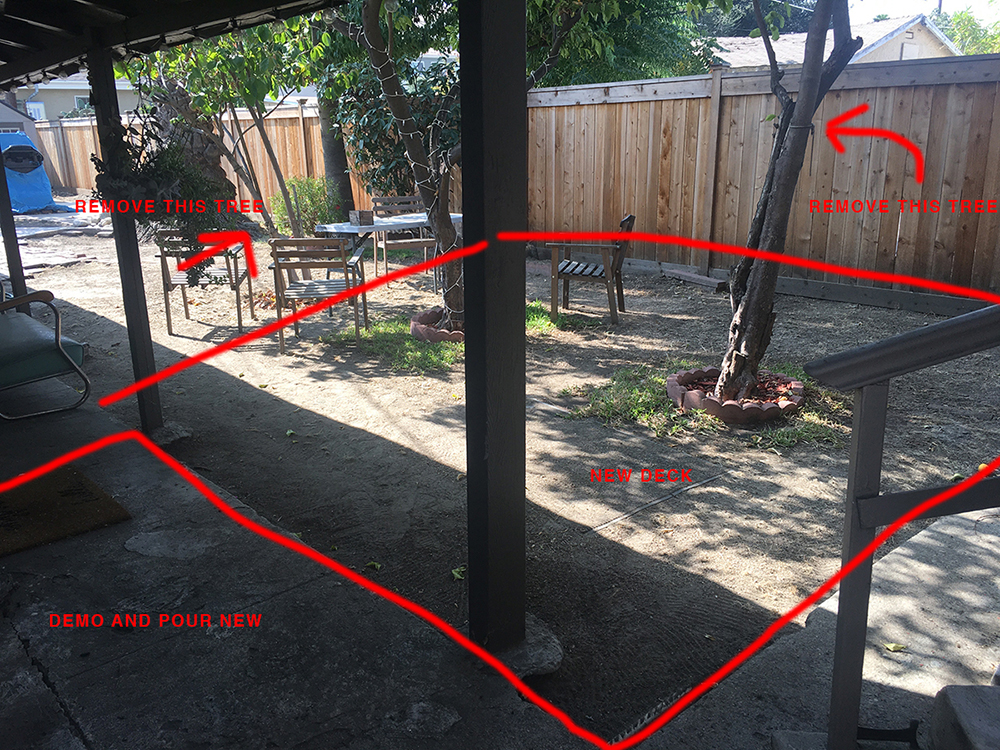
Sorry about the ugly pictures and ugly notes, but there’s really no better way to convey this information!

pin it!

This is the area between my main house and my cottage — a 6′ wide path composed of 5 separate concrete slabs and mismatched bricks that were not secured in any way.

pin it!

My dream was to walk out the door onto a beautiful, new deck. Unfortunately, someone planted 3 trees right in the middle of the area outside my house, so there was no room for a deck. I decided that I didn’t need 5 lemon trees, so I had two removed. I also removed 4 or 5 smaller bushes and shrubs that were poorly placed. pin it!
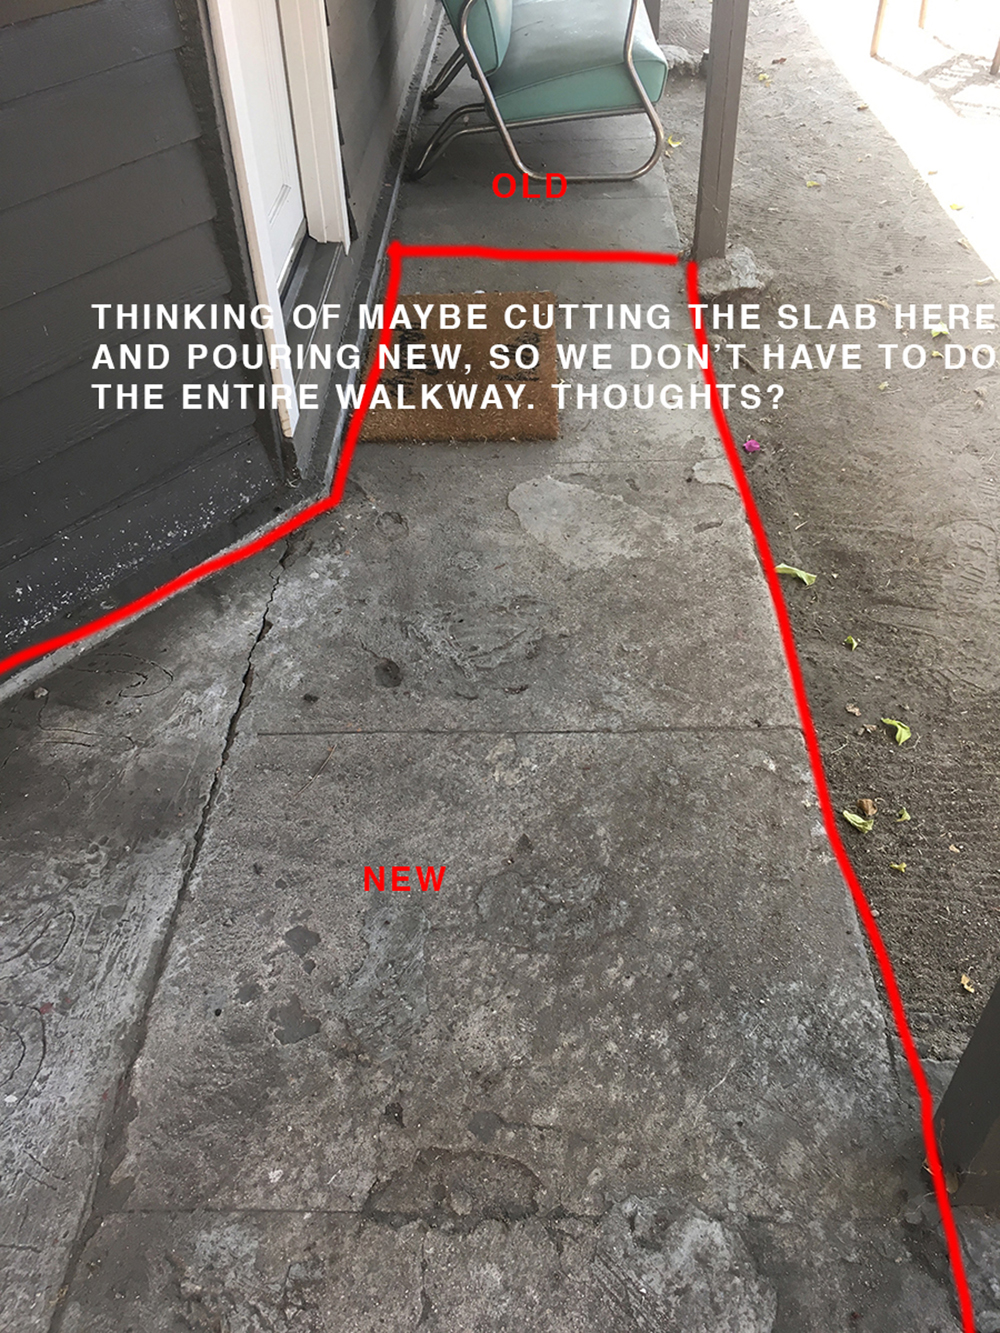
This is what much of the concrete looked like on my property. I think this is a result of someone doing a skim coat over an old slab without proper preparation, so the top layer chipped off over time. pin it!I am relatively experienced when it comes to interior design, but landscaping was all new to me so I did what any civilian would do – I went on Pinterest and started pinning. I put a good 200+ hours into the design and research over the course of 6 months. It became clear to me that if I was going to renovate this yard it would be a 100% complete demolition and rebuild.

pin it!

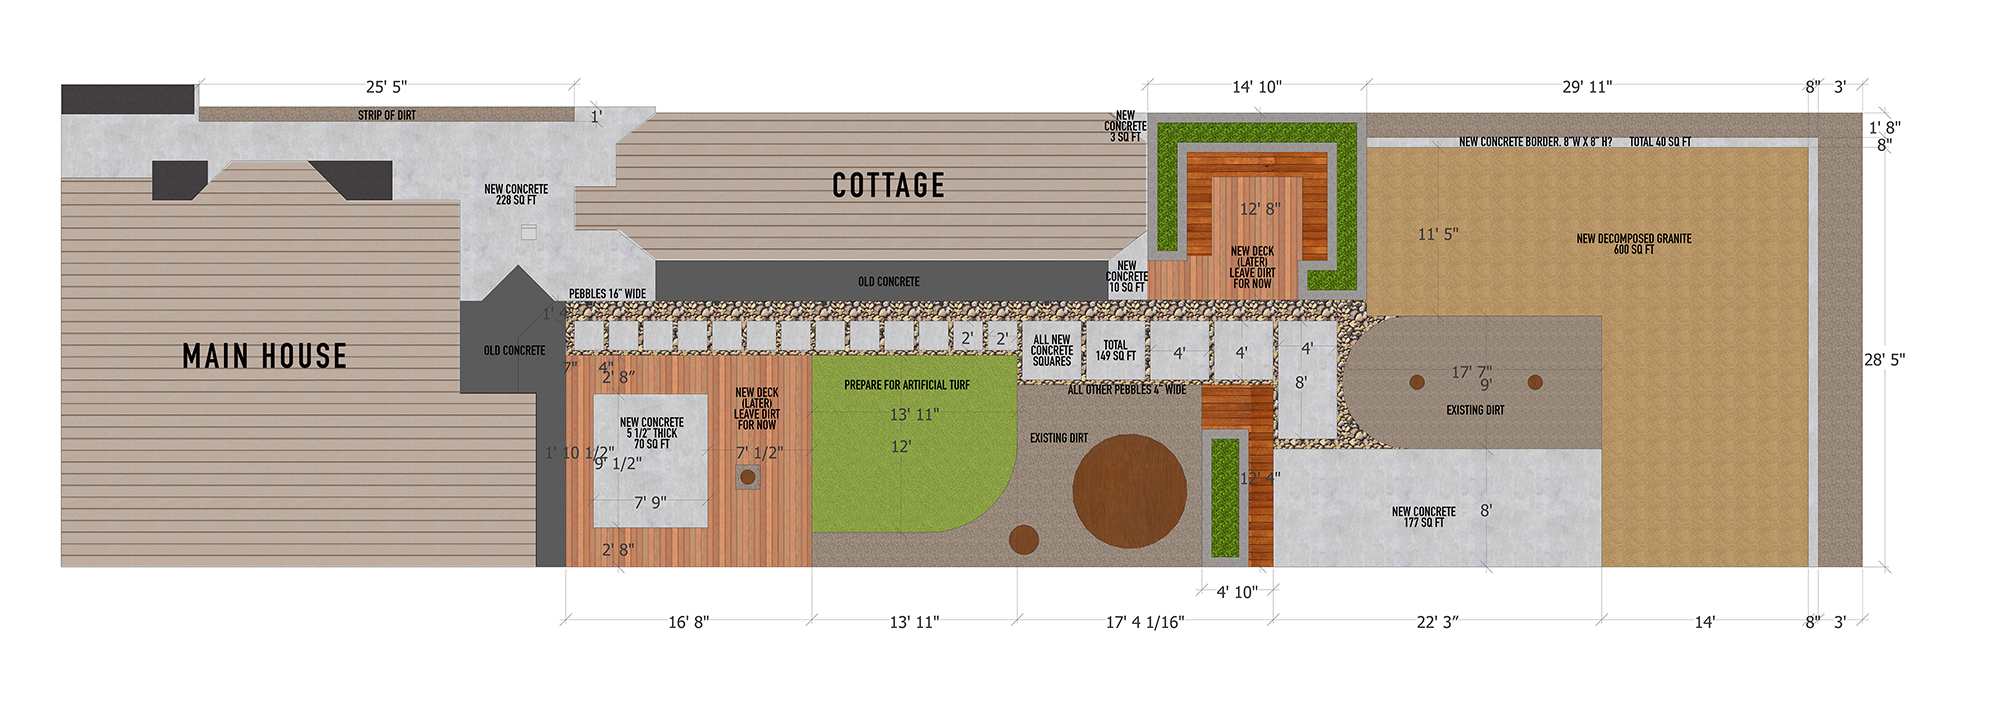
My plan was to create zones. Starting from the area closest to the main house, I would have a deck, then a fake grass area for lounging, then a second deck with build-in seating, then a concrete slab that I would use for building projects, and finally, a bunch of decomposed granite at the back which is a porous/non-permanent ground cover that I could put down for the time being until I’m ready for Phase 2. (Future art studio?!)

pin it!

I didn’t know any landscape contractors at the time, and finding one who was available ASAP was a challenge. Most of the reputable companies weren’t available for two or three months.  I eventually found a contractor who was local and seemed to run a legit business.

I’m an extremely detail oriented person and I did so many drawings, sketches, and lists to convey what I wanted. From the beginning there were misunderstandings, changes, and additions, and my contractor definitely charged me for every single little thing.

pin it!

For example, I meticulously measured out where I wanted all of my concrete slabs to be poured. All of the forms were laid and the concrete was poured on the same day – a day when I was at work. I left during my lunch break to check it out and for the most part, it was all fine. However, I definitely told the contractor that I wanted him to make the yard all one level. He took that as me wanting the yard to be flat but at a slant,  and he went ahead and poured a concrete border along the entire back of my yard at an angle. When I came home from lunch, I freaked out because it looked ridiculous. The boss wasn’t there and I called him right away and told him that this was not at all what I wanted. We ended up having to demolish the freshly poured retaining wall and grading the soil which added $2k+ to my already huge estimate.   pin it!

pin it!Every time my contractor would find the smallest thing in the ground like a tree stump or a small blob of concrete he would charge me $1000 to take it out. I mean, look at these blobs in the dirt. He actually charge me $1000 to remove them. The most annoying thing about working with a contractor is that once you’re neck-deep in all that mess, the only way to make the suffering stop is to get it over with. Contractors are in a very good position to charge exorbitant amounts for overages/additions because they know that the homeowner is somewhat desperate and feels like it’s too late to start over and form a new relationship with a new company.

pin it!

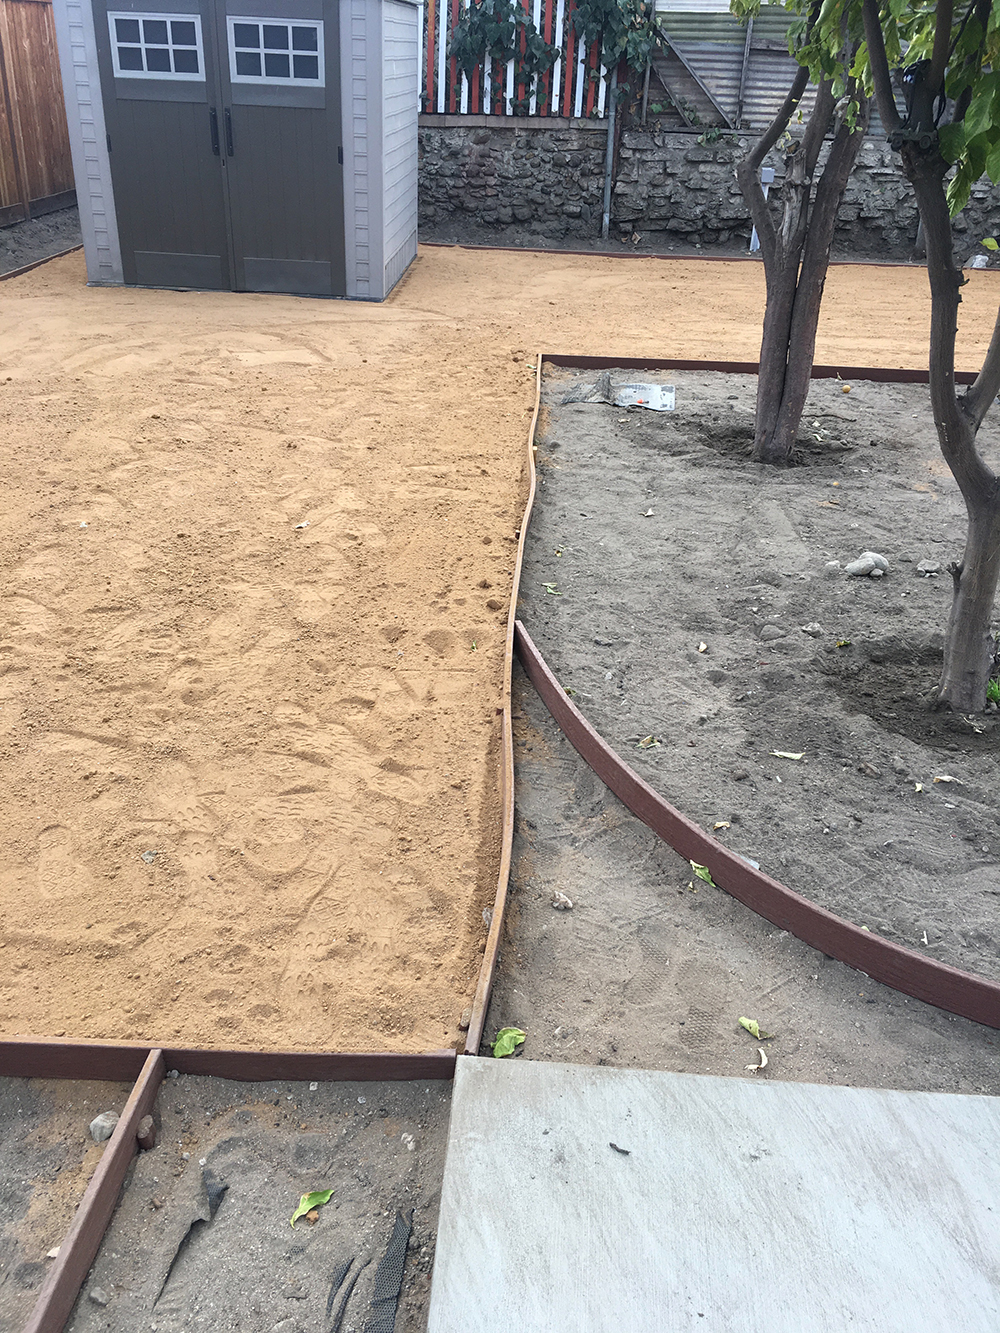
This is another example of my contractor charging me ridiculous overages. I asked him if he could obtain an install these plastic edge pieces in order to create delineations between the rocks/turf/decomposed granite (light brown stuff that running paths are made out of). He gave me a long speech about how he uses the best products so the project was going to cost $1800 for materials and labor. I totally fell for it. Once the edges were installed, I felt like they looked particularly wonky and cheap so I went to Lowe’s to see if they had anything that would be better for the job, and I come to find out that the product he installed was literally worth $100 and he charged 10 times that.

This is when I finally snapped and I decided to sever my relationship with my contractor. I ended up paying him 85% of what he charged me, but I refused to pay the last 15% because he was ripping me off. There were a lot of emails and invoices sent back-and-forth as well as threats of legal action on both ends, but ultimately he accepted my suggestion to take the 85% and end our relationship.

I do not think this contractor is a bad person, but he was one of those foremen who comes to the job site for 10 minutes in the morning, blurts some instructions to his team, and then leaves, and doesn’t come back until the next day. I’m not exactly sure how much better this would have been with a different company, but now I know that for me personally, I want to manage all large projects myself from here on out.

Once the contractor was gone, everything was pretty smooth from that point on. I did a lot of the work myself, but I hired specialists to do specific jobs (a turf guy to do the turf, an electrician to do the electrical.)  And then my AMAZING friends Jef and Michael came on board to finish the deck.

pin it!

pin it!Jef and I tiled the concrete slab together which was relatively straight forward because we had tiled some stuff at my Richmond house a few months prior.

pin it!My brilliant carpenter friend Michael Forbes built the deck to my specifications. He even built it at a 2 degree slant for drainage and worked around my lemon tree! It’s perfect, I love it so much!

pin it!I had to haul 7000 lbs of landscaping rock to go between all the concrete pavers.That was a blast.

pin it!

pin it!I bought a zillion plants and plopped them into the ground. This is a view from the back of my lot toward the house. I decided to hold off on deck #2 on the right because I was hemorrhaging money faster than I was earning it.
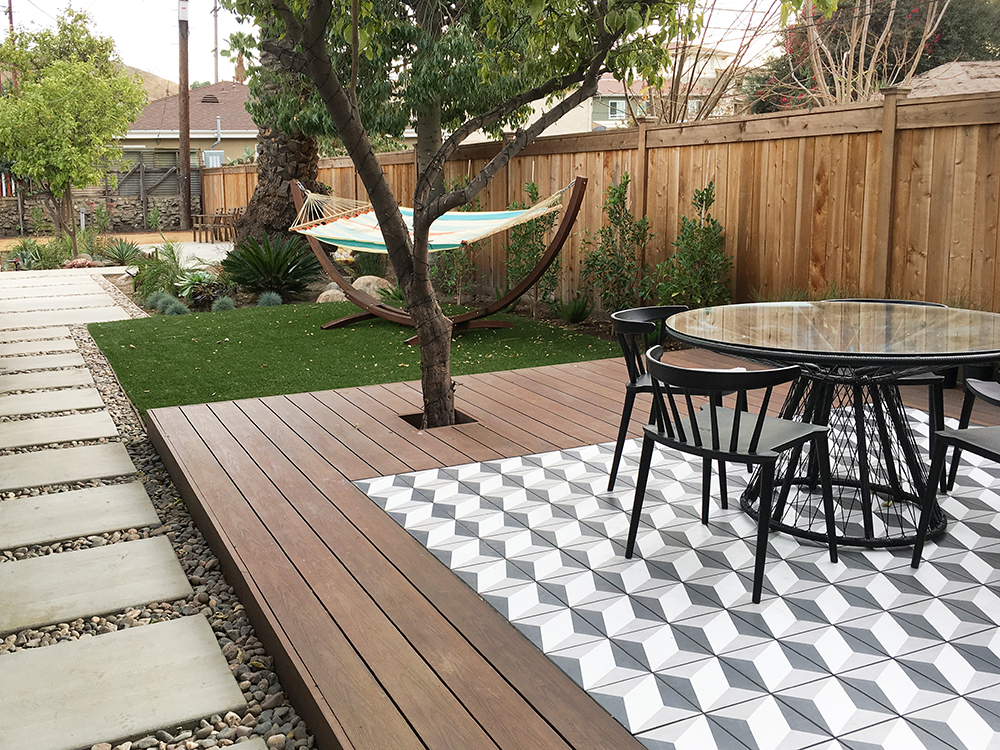
pin it!The actual renovation took about a month, and despite being the #1 MOST ANNOYING RENOVATION PROJECT of my career so far, I’m really happy with how it all turned out. A few big lessons that I learned:

1) Level and flat are two completely different things, and when you’re talking about that in a landscaping context, you have to be ultra clear what you’re trying to say.

2) Whatever you think your landscaping budget is, DOUBLE IT. And then double it again.

3) Just because someone says they “can do everything,” that doesn’t necessarily mean that they’re great at everything or will give you a fair price. Contractors outsource, too and mark up everything. It may be worth it to find your own specialists to come in and perform the service that they advertise, even if it’s more work.

4) Try to be at the job site as much as possible. I’ve been working in the business of designing/building for 13 years, and I’m still surprised how often mistakes are made by all parties. Also, if you have to hire a contractor to manage a project, ask if that person plans on being on the job site regularly.

Changing topics: I also renovated my front yard! And the exterior of my cottage! OMG so many things to share. More to come. XX

Posted by Jen at 12:02 pm — comment
Categories:
Jan 6

Jen’s Richmond Reno: New (Old) Fireplace Mantels!

This house was built in 1908. Who knows how many people have lived here/died here/made breakfast here/celebrated Christmas here. This house will outlive me by decades…maybe even centuries. It’s a good thing I don’t really believe in ghosts, because if I did, I’d be surrounded by them.

pin it!

A few months ago I was demolishing my old dining room fireplace mantel, and I found this wedged in the baseboard  — a tintype that could date back as far as 1850. I would love to know more about who these people are — did they own the house? Did they build the house? Were they family? For now, I have named them Alfred and Gertrude. I plan on leaving them in the house forever because it seems like it would be bad luck to take them out of the home they’ve lived in for over 100 years.

pin it!

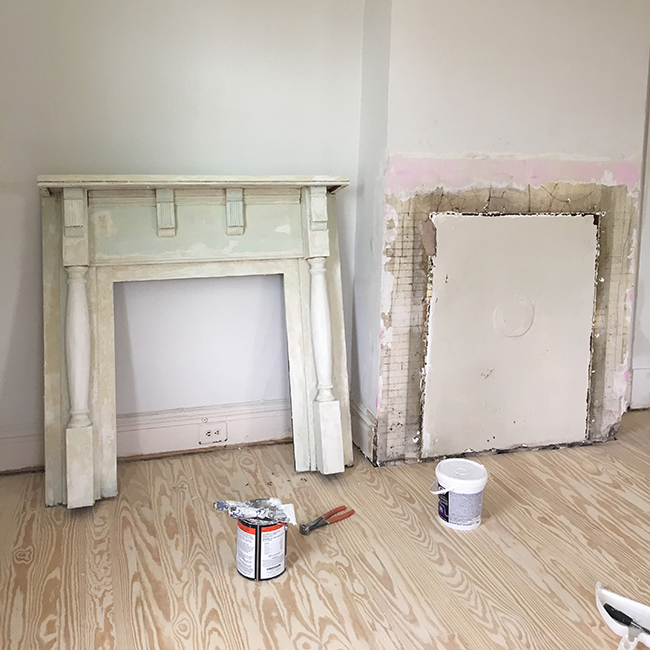
Aaaanyway, back to design. This is a pic of the living room. The old mantel doesn’t look that bad in this photo, but it was actually very poorly made and stylistically arbitrary. It was also slightly out of level, which drove me nuts. I wanted to find something more appropriate for the age of the house since this living room/sitting room is the first thing you see when you walk into the house. I was in California during most of the planning process for this house, so I started my search on Craigslist.

pin it!

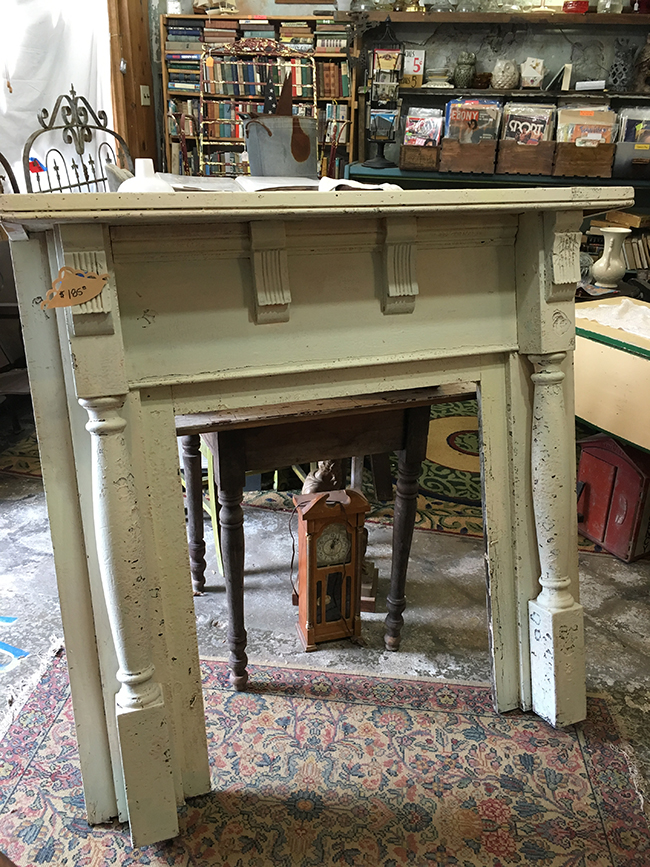
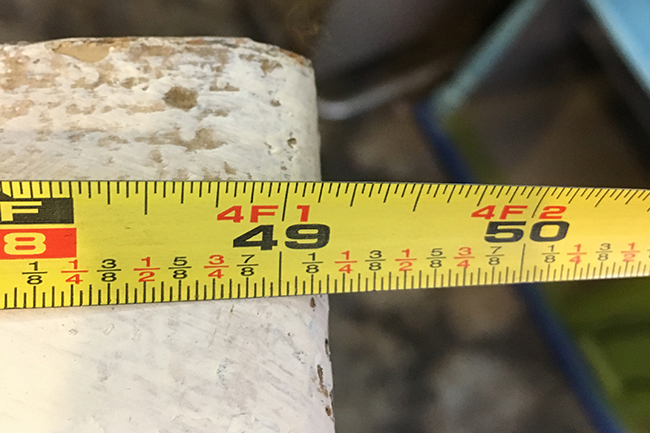
Praise the internet, for within minutes I found this little guy. I can’t say that is was love at first sight, but I definitely noticed it was proportionately similar to my old mantle. I emailed the shop and asked the sales lady to send me some dimensions. I was looking for something that was 49 1/2″ or less. She came back to me with this photo.

pin it!

49 1/4?! Literally perfect. At that point I wasn’t even going to overthink it. Even though parts of this mantel looked like it had been chewed by a hungry squirrel, I called the lady and arranged to have it dropped off at the house.

pin it!

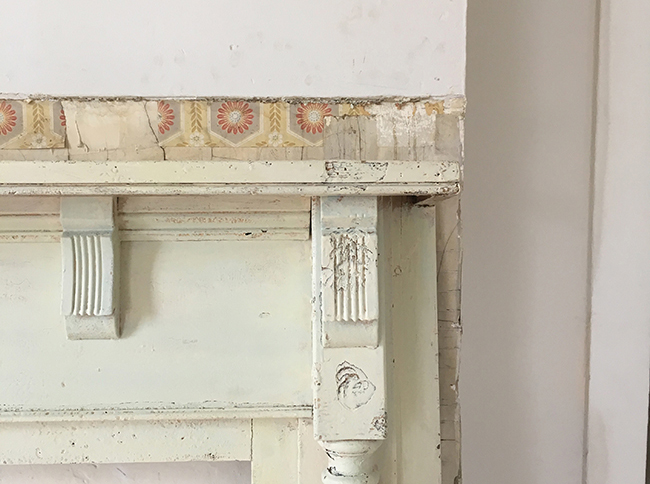
When I demolished the old mantel, I uncovered little bits of this vintage wallpaper from back-in-the day. I love uncovering little surprises like this. It makes the process of renovating feel more soulful.

pin it!

The mantel needed a ton of patching, priming and painting. I re-built all the damaged area with Ready Patch, my favorite patching compound in the world. When I’m patching raw wood, I use wood putty, when I’m patching painted wood, I use Ready Patch. At this point I’d estimate that half of my house is made out of putty and joint compound of some kind.

pin it!

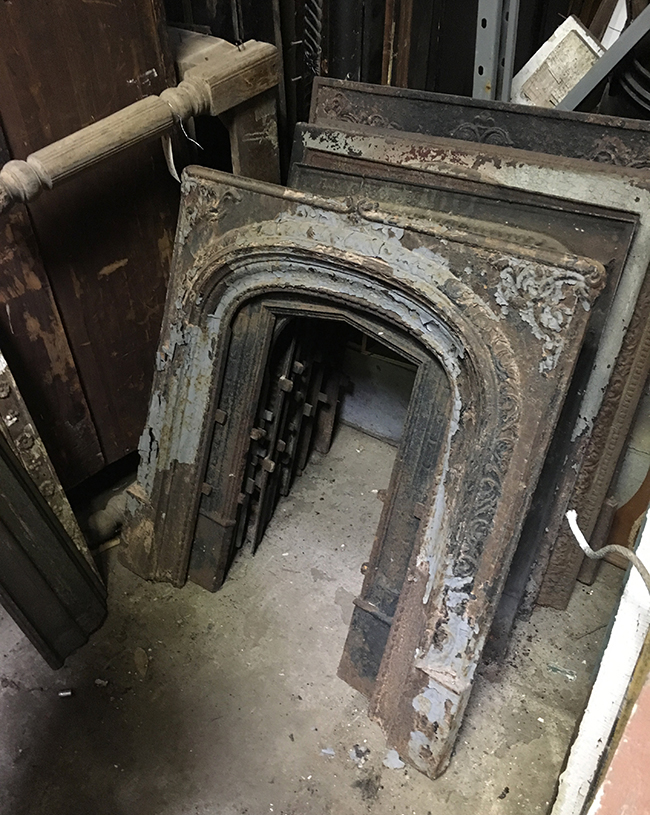
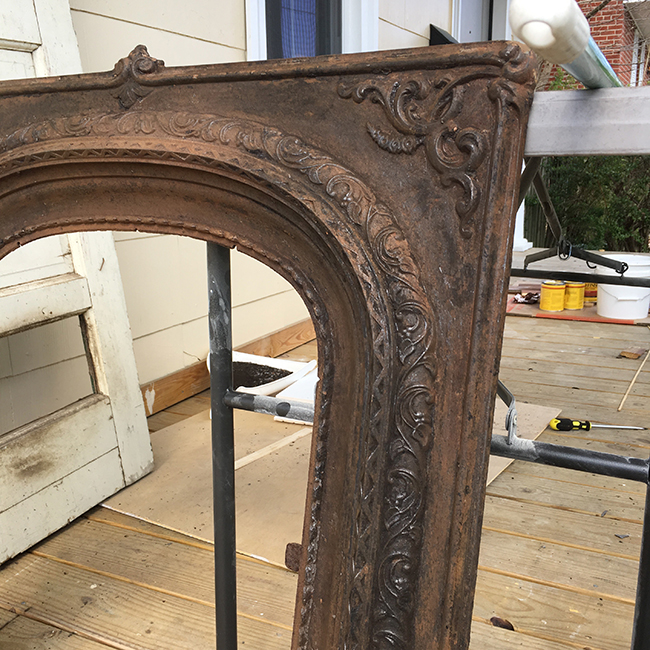
Next, I needed to find a fireplace insert. I had the hardest time figuring out what these things are called. Fireplace surrounds? Firebacks? Even after extensive searches on Google, I’m still not sure what these things are called. Fortunately, local thrift store owners understood what I meant when I said I was looking for “iron things that go inside the mantle.” One store in the outskirts of town had a ton, and I found one that was a pretty close match size-wise, but it need a TON of clean-up work. pin it!

I  spent 4 hours brushing flakes of paint off with a wire brush, polishing with an attachment on my drill, and manually picking little bits out of the crevices with various sharp tools.  pin it!

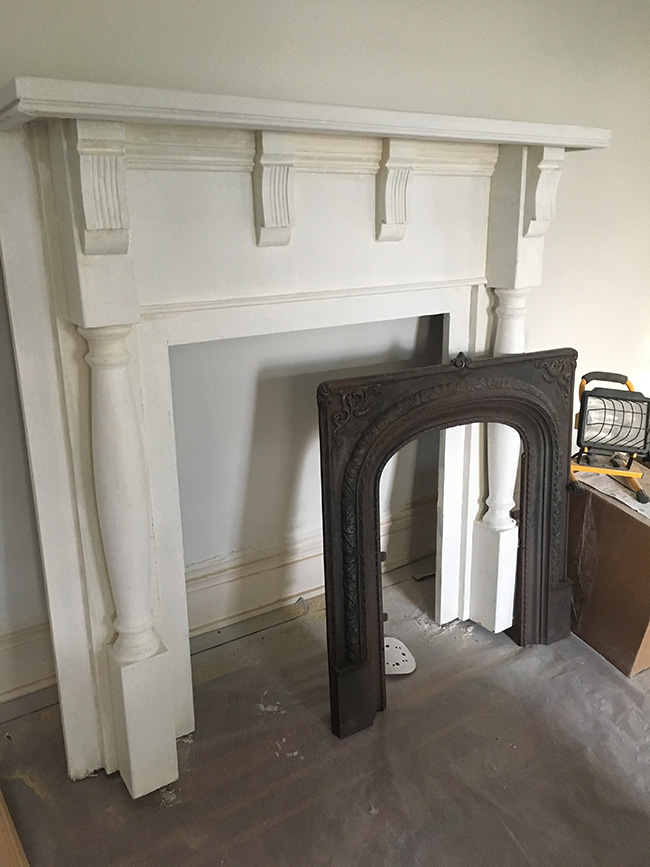
I considered just waxing the iron fireplace surround so I could preserve the rich brown color, but the surface had a lot of scratches and splotchy color inconsistencies from me scraping the paint off. This was also toward the end of my renovation, and I was feeling rather impatient, so I ended up just spraying it gloss black. It doesn’t really really have as much WOW factor in the photos, but in person it was still pretty. Here’s a pic of the mantel all cleaned up!

pin it!

pin it!

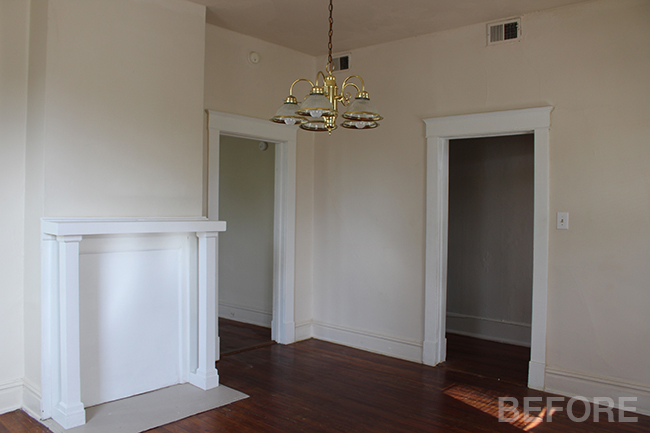
The living room shares a wall with the dining room which also has a mantel. The two mantels are back to back. This room had an even bigger, crappier mantel.

pin it!

I ripped the mantel off the wall, and that’s where I found that amazing tintype of Gertrude and Alfred. pin it!

There was really no limit to how big this mantel could be, so I considered really tall mantels and really ornate mantels, but eventually I settled on one that was classic and inexpensive. I think it was about $125. I opted against doing a metal fireplace surround for this room. Again, trying to keep the project as on-budget as possible. I saw a lot of pics of faux fireplace mantels online with nothing inside them, and I thought that would look fine.

pin it!

After I patched and painted the walls, I used plaster screws to secure this to the wall. The old mantel was attached to a crappy wood hearth that was covering some damage on the floor, so I built a new hearth and installed some quarter round edging that matched the floor perfectly.

pin it!

I found this simple mirror for $15 on Craigslist (thanks for lugging it for me, Christine!) I cleaned the floors and for the first time in weeks I was able to sit on the ground because it wasn’t covered in filth. Only a few more projects and I’ll be done with #jensrichmondreno! Eeeek!  Up next…upstairs bathroom.

Posted by Jen at 6:45 am — 4 comments
Categories: , ,
Nov 4

Jen’s Richmond Reno: The Downstairs Bathroom

Sometimes it’s hard to fully appreciate a dramatic before-and-after transformation without seeing the “before” in person.  Photographs can be very forgiving and I often tell people that a “before” picture of a room might look decent, but TRUST ME, in real life it was looked way worse.

This is not one of those situations because for once, even in these small photos the room’s grossness really translates. Hooray! Behold, my downstairs full bathroom:

pin it!

pin it!

Can we just note how ridiculously off-center this cabinet and sconce are? I’m sure this was because the medicine cabinet was mounted between studs, but I’m still surprised that whoever installed this felt that this was the best possible option.

pin it!

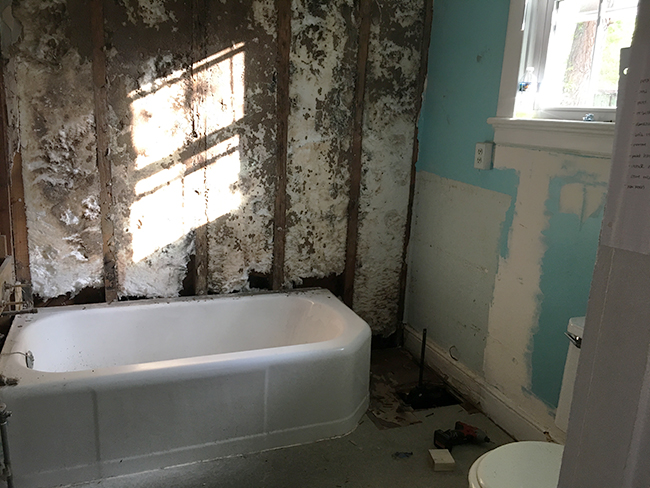
I have no idea what this wall-mounted box is. I ripped so many mystery cords and wires off the house. And let’s not forget the saddest little corner of the house — this janky divider wall and adjacent cubby made entirely of scrap wood.

pin it!Side note/pro tip: bathtubs make the best scrap wood bins :) pin it!

The walls in this room were so spongey and soft from moisture that we had to rip all the drywall out. My first instinct was to lose that divider wall completely. When I knocked it down, it did make the room feel a lot bigger. There was more natural light without the big wall in the way. Unfortunately, losing the wall would have meant having to get a 90 degree shower curtain rod that would wrap around 2 sides of the tub and I would have sacrificed all the storage in the room.

pin it!

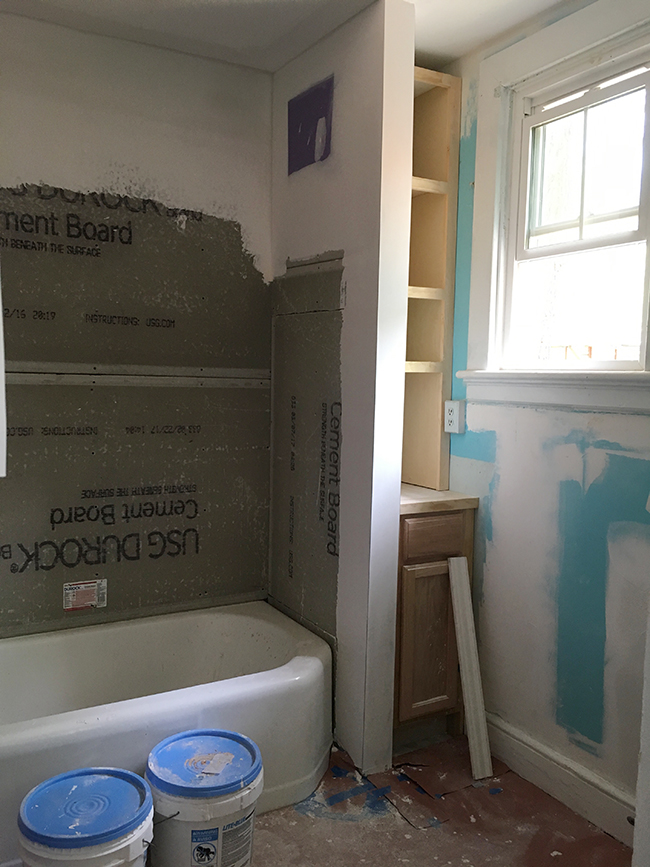
In the end I decided to re-build the wall with way more support, then install a 12″ wide kitchen cabinet from Lowes and build custom shelving above it to fully utilize the small space.

pin it!

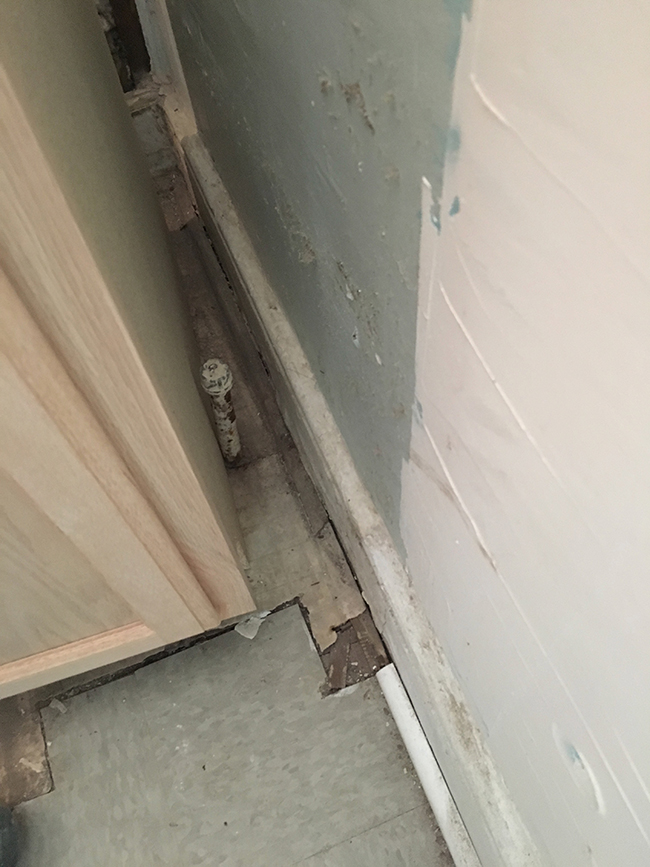
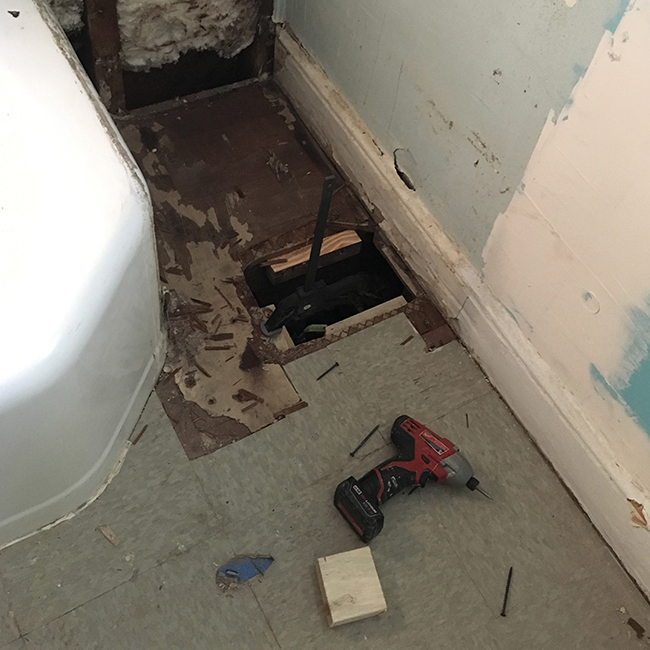
My lower cabinet wouldn’t fit in the nook because there was this annoying pipe coming up from the ground. My plumber said it was a gas pipe and suggested that we just cut it shorter and cap it off under the house. pin it!

And that’s how I wound up with a huge hole in the floor. We had to make the hole big enough for my plumber to fit his hands in there so he could cut and cap the pipe. Fortunately we didn’t have to make the floor patch pretty. We just secured some plywood over it and covered it up. pin it!

pin it!

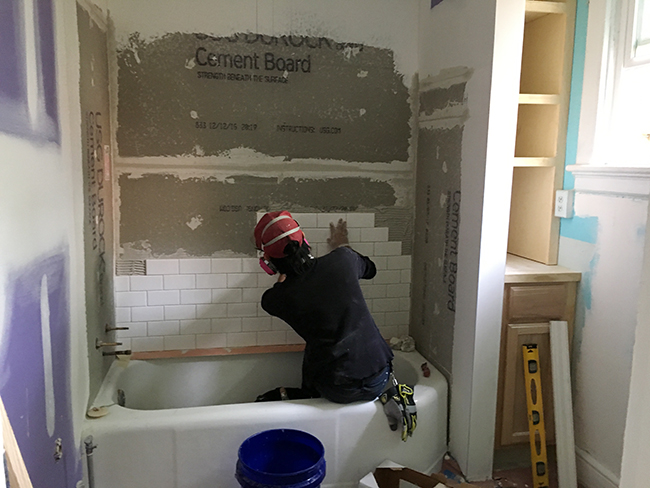
It’s safe to say that this turned into a complete bathroom overhaul, but because it’s a rental, I still wanted to keep my budget within reason. I chose to use simple white subway tile and I had my awesome art assistant Jef install them with me.

pin it!

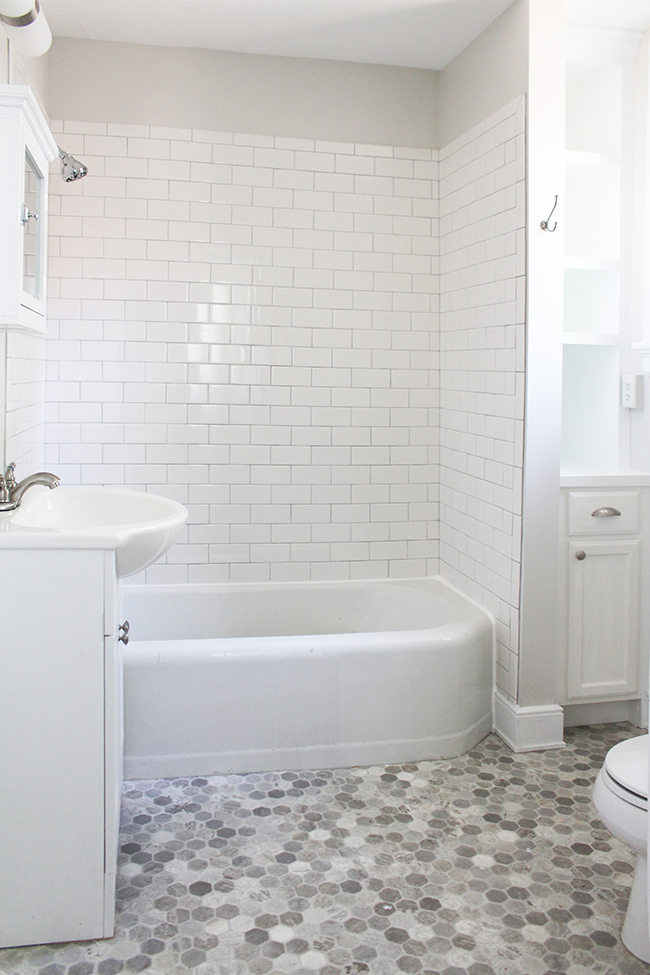
When the project was nearing completion, I was finally able to lay the new floor. I chose this amazing hexagon vinyl flooring. I saw this floor for the first time on one of the shows I art directed and I was impressed by how realistic and durable it was. It also has a subtle texture that’s so realistic that 3 of the vendors who came to my house thought it was natural stone at first. The old bathroom floor was 70s gray linoleum tiles, but they were in perfect condition, so I just laid the new hexagon flooring over it. I made a giant stencil out of paper to make sure that all the cuts would be perfect, then just plopped it down. This vinyl doesn’t even require any kind of adhesive! I did caulk the seam between the tub and the floor just in case.

pin it!

I quite liked the rounded edge of the tub, but it created an awkward little corner that was super difficult to tile. I also learned that edge tiles are incrementally smaller than regular subway tiles. WHY would you do that to us, Dal Tile?! pin it!

It’s not a very big room, so I really just have this one photo that gives you the best idea of what it looks like to date — super simple, bright, and clean. Up next: the upstairs bathroom renovation!

Posted by Jen at 11:58 am — comment
Categories: ,
Jul 26

Jen’s Richmond Reno: The Kitchen

I’ve always said that kitchens are my favorite room to design. I love sourcing cabinets, tiles, and appliances. I love to space plan for hours on end. I love the permanence of them — you have to make decisions really carefully because for the most part, once a design choice has been implemented, there’s no turning back! It just so happens that I also spend 75% of the year art directing Food Network shows and designing kitchen sets. Funny…I basically never cook.

01pin it!

I bought this house without seeing in in person first, so I didn’t have a great idea of exactly how much work needed to be done. Fortunately, my amazing friend Christine went to check it out for me. I trust her judgement 100% and she gave the house her seal of approval. The price was right and the bones were good.

This kitchen had a few things going for it. It’s a generous size, it has big windows that let in a ton of natural light, and the cabinets are old but solid.

There were a few things I was definitely not a fan of. That column in the middle of the room was a bummer. At some point this space was actually 2 smaller rooms, and someone knocked down the wall and added the column for support. If I were doing a full overhaul on this space ($25-$30k) I would have considered hiring an engineer to help me figure out how to make the column go away, but honestly, when you’re in the space, the column is not terribly offensive. I knew that something like a column wouldn’t be a deal breaker for a renter considering how great the rest of the house was, so I decided that the column was going to stay. The linoleum flooring was not particularly attractive, but it was brand new and in perfect condition so I decided going to keep it.

03pin it!

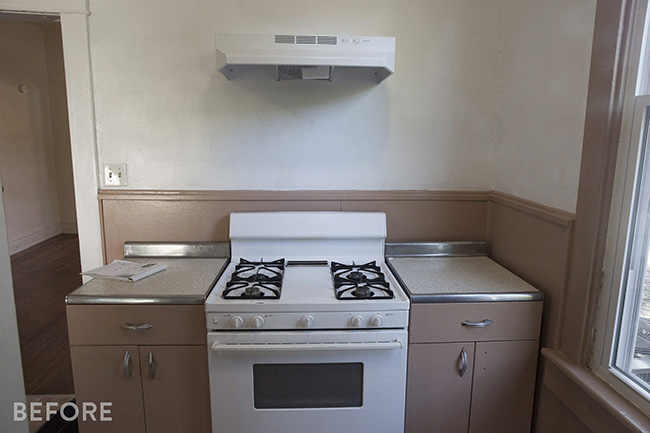
The stove was in fine working condition (I actually have this exact stove in my apartment in NYC and I love it even though it’s very basic.) The cabinets on either side were made out of metal that had been dented over the years. Wood cabinets are more appropriate for the age of the house, so I got rid of the metal cabinets. And that range hood. SIGH. What a sad, sad little guy…all alone on that big wall.

02pin it!

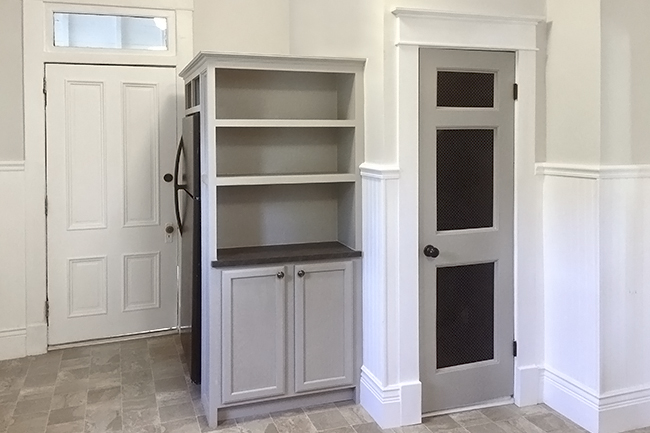
The other side of the kitchen was a mess. There was a closet that housed the HVAC system and a big black fridge that was weirdly disconnected from the rest of the space. I spent hours thinking of ways to make the fridge seem less awkward. Do I move it forward? Do I turn it 90 degrees? Do I buy a sexier fridge and just leave it where it is? More on that later…

4pin it!

I whipped up this moodboard in LA while anxiously waiting  for the house to close — fantasizing about how this simple kitchen renovation could be done in a week or so. In theory, my plan was simple:

-Install new (faux) beadboard and bring it up higher so it reached the bottom of the cabinets

-Replace the metal cabinets, clean up the existing wood cabinets, and repaint everything to match

-Install a new dark laminate countertop

-Build a big range hood for drama

-Switch out all hardware and add bronze accents throughout

05pin it!

Oh, but it’s NEVER that simple, is it?! I was surprised to discover that the most time consuming project in the entire house turned out to be the beadboard in the kitchen. The story is so boring I almost don’t want to talk about it…but I’m going to talk about it anyway.

When I bought the house, there was some poorly installed trim and cheap, crappy panels on the wall. Once I ripped those off, I discovered that there was already original, authentic 3/4″ thick beadboard on the original walls of the house, but not on the walls that were added later.  My initial plan was to take all the beadboard off and just start over so it would all match. I started yanking all of it off until I realized half way through that some of the beadboard was actually insulating the exterior walls of the house. I had a bit of a freakout, put all the beadboard back and went with plan B.

Plan B was to add some furring strips across the entire room so I could run the beadboard higher, then go over what was already there. Let me tell ya – it’s not an easy task to install beadboard in an old wonky house with plaster walls. Beadboard basically adds a subtle vertical striping to a room, and it has to be installed SUPER level in order to look right. If it’s even the tiniest bit off, you can really tell.

06pin it!

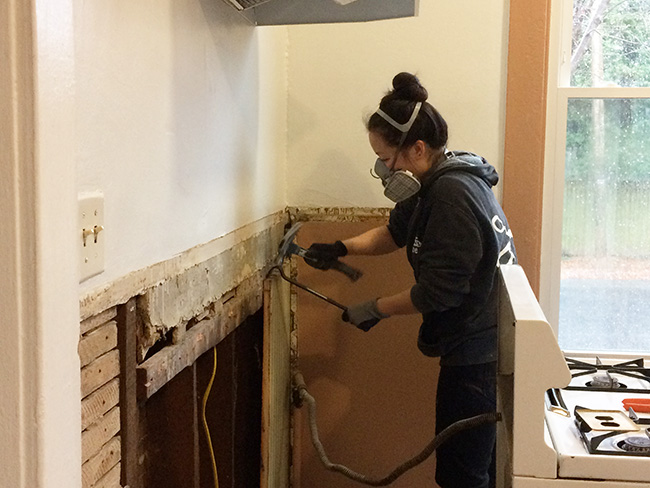
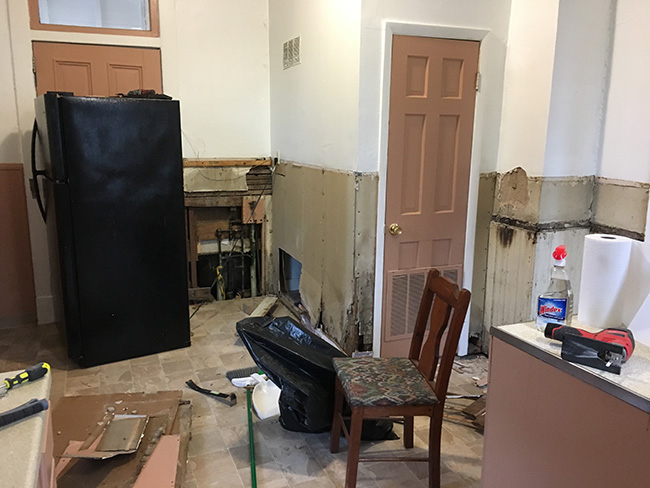
This was definitely one of those situations where it got a lot worse before it got better. Apparently the awkwardly placed refrigerator was hiding  the plumbing to my downstairs bathtub. When I rolled it to the side and ripped off the flimsy paneling, I found this mess behind it.  Some of the old drywall cladding the HVAC room was dried out/water-damaged/crumbling and needed to be replaced. Every time I removed a big nail from the original plaster, a huge chunk of wall came out with it. And can I just point out that hideous vent on the little door to the furnace room?

07pin it!

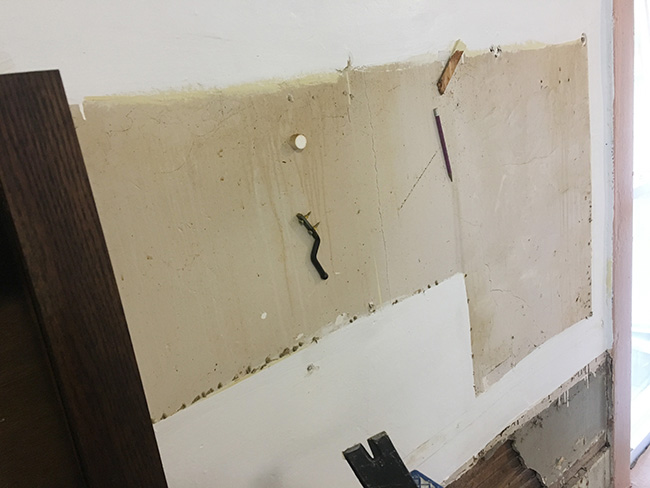
A bit of hilarity — I removed the upper cabinets in order to sand/prime/paint, and I found all kinds of weird stuff smashed into the wall, stuck on by 70-year-old kitchen grease.

08pin it!

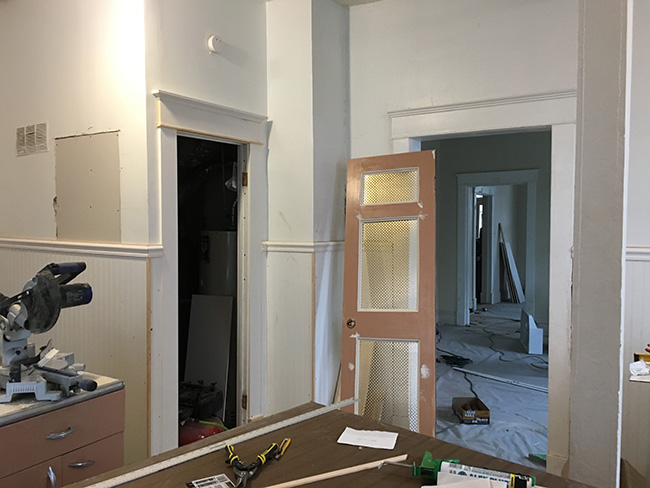
Remember that dumb little door with the vent leading to the HVAC room? I kept the door, but decided to give it makeover. I cut out all 6 of the recessed panels and added metal radiator grates so it would allow for plenty of ventilation.

09pin it!

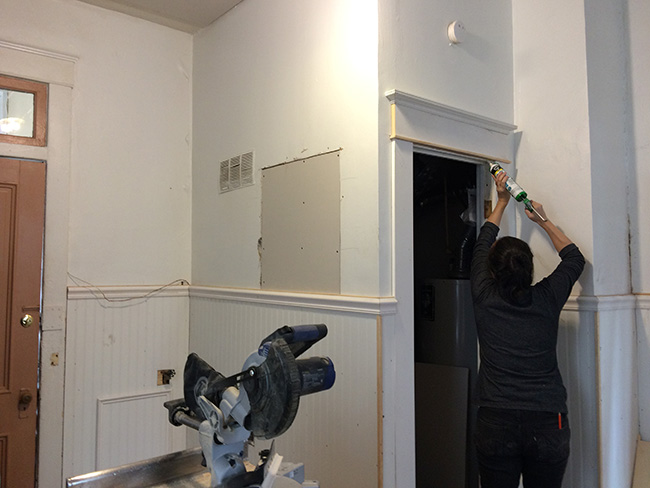
Even though this little door was leading to basically a closet, it was located right next to the doorway  to the dining room which had pretty original trim on it. I decided to build out the trim around the HVAC room doorway to match. Original trim on the right, new trim on the left. It’s not exactly the same, but it’s pretty darn close. I’m obsessed with moulding. I spent 10x what I had initially planned on moulding because I kept finding different places that I wanted to add it.

10.5pin it!

White caulk is my best friend! I’m seriously considering doing an entire post on caulk because I am so passionate about it.

06.4pin it!

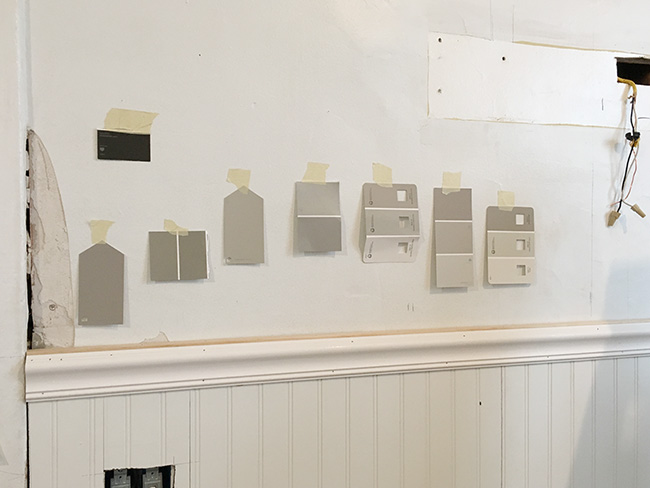
I’m sure you are all shocked that I chose gray for the cabinets! This color is Valspar Montpelier Ashlar Gray (6004-1C) It has a lot of warm undertones and I liked it so much in the kitchen that I ended up painting every single interior door in the house this color.

10pin it!

A closeup of my little furnace room door. New bronze hinges and knobs for the whole house, y’all!

11.5pin it!

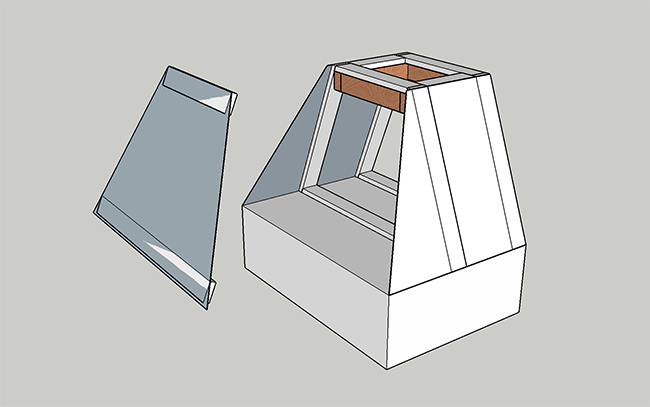
Remember the cheap white range hood over the stove? I built a big dramatic wood hood to go over it! The design was relatively simple, but it had some crazy angles, and I didn’t have a table saw at the time, so it definitely took some ingenuity to engineer.

11pin it!

I built the frame out of light-weight pine and wrapped it in 1/4″ plywood. It’s been a while since I had to build something with weird angles. It was nice to use my brain in that way again.

12pin it!

A little crown moulding, and BAM. Instant impact and drama! Only cost me about $100 for materials.

13pin it!

I built the bottom part of the hood first, then I mounted that to the wall and added the vertical shaft separately so all the side panels would be super flush with the wavy plaster wall.

16pin it!

Because I am a perfectionist, rather than paint the cabinets while they were in place, I took all the cabinets off the walls, lugged them to the garage, removed all the doors and hardware, cleaned them with degreaser, sanded, puttied, sanded again, primed, and painted. Then I hung them back on the wall and added the same crown moulding that I used on the hood to give them a more high-end look.

02pin it!

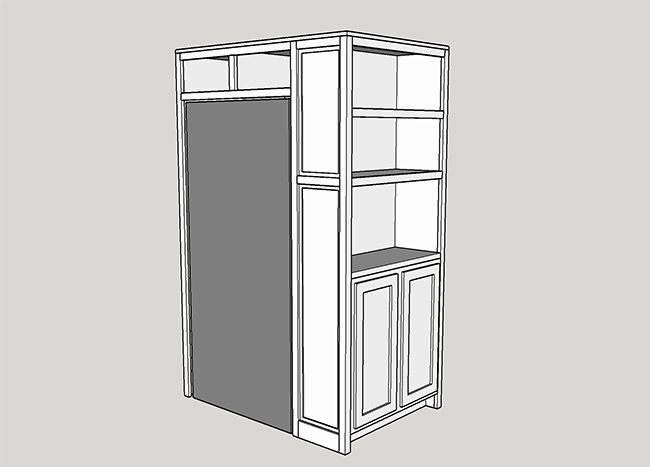
Earlier in the post I mentioned that I had the hardest time figuring out what to do which the fridge which was positioned awkwardly in the corner of the room.

16.5pin it!

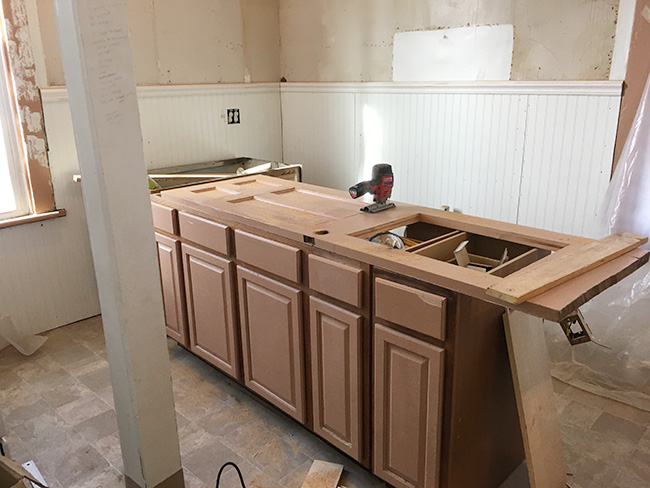
After considering about 5 different solutions, I finally landed on this sketch. I created a shelving unit that faced the kitchen, then turned the fridge 90 degrees so you access it from the side. You basically don’t even really realize the fridge is there, which is great because the fridge is in good condition but kind of dated.

17pin it!

After working on my house alone for 6 weeks, I was pretty exhausted so I flew my amazing art assistant, Jef out to Virginia to help with the last leg of my project. I couldn’t have wished for a better apprentice to help me get everything done! YOU ARE MY HERO, JEF! I owe you a thousand steaks and bowls of macaroni and cheese.

18pin it!

In the end, the kitchen alone took me 2.5 weeks, working 16 hours/day. It was definitely a very time consuming project and I spent about 35% more than I had budgeted. Once I started, I was 100% committed and couldn’t stop until everything was pretty much perfect. It was totally worth it though. I didn’t want to show the house to potential tenants and feel embarrassed by the kitchen. Since the kitchen was the first room that was (mostly) finished, I spent the most time in there of any room in the house and became really attached to it. Here are some “after” pics!

19pin it!

20pin it!

fridge_smallpin it!

21pin it!


Posted by Jen at 3:52 pm — 1 comment
Categories: , ,